一些在逆向过程中恢复 Google Protobuf 对象结构的方法。
Protobuf Protobuf 是 Google 推出的一款开源跨平台的序列化数据结构的协议,它在执行效率、兼容性等方面比较优秀,在 Google 内部以及很多大型项目中被广泛使用。
Protobuf 的基础是 proto 文件以及 protoc 编译器,开发者把想要进行序列化的对象定义成 .proto 文件,然后利用 protoc 编译成对应语言的代码,这样就可以在业务中使用代码提供的各项接口来操纵对象。关于 Protobuf 的基本使用可以参考 Google 官方文档。
Protobuf 灵活高效,在开发时可以很方便的使用,但从逆向角度来看,Protobuf 序列化之后的数据一般以二进制形式保存,例如我们定义如下 protobuf 对象
1
2
3
4
5
6
7
8
syntax = "proto3"; message ExampleProtobuf { string name = 1; int32 price = 2; string location = 3; }
然后实例化一个对象并将其序列化
1 {"name":"apple","price":10,"location":"A-10"}
最终会得到结果(HEX 编码)
1 0a 05 61 70 70 6c 65 10 0a 1a 04 41 2d 31 30
结果中可以直观的看到我们定义的字符串数据,但数据类型和名称等信息已经丢失,针对更加复杂的对象则难以分析,需要某些方法从 protoc 生成的代码中恢复数据结构。本文我们会尝试从 JAVA、Python 以及 C++ 三种不同语言中恢复 Protobuf 对象的定义。
JAVA 中的 Protobuf 以开源项目 https://github.com/simplesteph/protobuf-example-java 为例,将项目克隆到本地,使用 IDEA 编译,然后找到生成的 jar 文件使用 jadx 反编译分析。
首先查看 SimpleMessage 的原始定义
1
2
3
4
5
6
7
8
9
10
syntax = "proto3" ; package example.simple;message SimpleMessage { int32 id = 1 ; bool is_simple = 2 ; string name = 3 ; repeated int32 sample_list = 4 ; }
从定义可以看到它包含 4 个成员,其中 sample_list 比较特殊,是一个列表。
在 jadx 中找到 SimpleMessage 的定义,虽然对象经过 protoc 编译后得到的是比较复杂的源文件,但得益于 java 的反编译效果,我们基本上可以完全还原这份源码,查看反编译结果即可清晰的看到变量名以及它们的类型
1 private static final GeneratedMessageV3.FieldAccessorTable internal_static_example_simple_SimpleMessage_fieldAccessorTable = new GeneratedMessageV3 .FieldAccessorTable(internal_static_example_simple_SimpleMessage_descriptor, new String []{"Id" , "IsSimple" , "Name" , "SampleList" });
1
2
3
4
5
6
7
8
9
private SimpleMessage () { this .id_ = 0 ; this .isSimple_ = false ; this .name_ = "" ; this .sampleListMemoizedSerializedSize = -1 ; this .memoizedIsInitialized = (byte ) -1 ; this .name_ = "" ; this .sampleList_ = emptyIntList(); }
仔细观察源文件还可以发现,其中存在这样的数据结构
1
2
3
4
static { String[] descriptorData = {"\n\fsimple.proto\u0012\u000eexample.simple\"Q\n\rSimpleMessage\u0012\n\n\u0002id\u0018\u0001 \u0001(\u0005\u0012\u0011\n\tis_simple\u0018\u0002 \u0001(\b\u0012\f\n\u0004name\u0018\u0003 \u0001(\t\u0012\u0013\n\u000bsample_list\u0018\u0004 \u0003(\u0005b\u0006proto3" }; descriptor = Descriptors.FileDescriptor.internalBuildGeneratedFileFrom(descriptorData, new Descriptors .FileDescriptor[0 ]); }
descriptorData 是一个主要由二进制字符构成的字符串,查看资料得知它是用来表示消息类型的描述符,包含了消息类型的结构化信息,例如字段名称、类型、标签等。而理论上可以通过解析这个数据结构来还原部分对象的原始定义。
开源工具 已经实现了这部分功能,例如使用工具中附带的 jar_extract.py 脚本处理 jar 文件
1 python3 jar_extract.py protobuf-example-java-1.0-SNAPSHOT.jar extracted
执行后会生成 4 个 proto 文件,其中 simple.proto 文件内容
1
2
3
4
5
6
7
8
9
10
syntax = "proto3" ; package example.simple;message SimpleMessage { int32 id = 1 ; bool is_simple = 2 ; string name = 3 ; repeated int32 sample_list = 4 ; }
结果和原始定义完全一致。
protobuf 支持对编译开启优化选项,共有三种优化级别,SPEED、CODE_SIZE、LITE_RUNTIME,默认情况下,采用的是 SPEED 模式,此时生成的代码执行效率高,但是占用空间更大,CODE_SIZE 模式占用空间小,但是执行效率更低,LITE_RUNTIME 牺牲了 protobuf 提供的反射功能从而兼顾执行效率和代码占用空间。
当采用 LITE_RUNTIME 模式编译时,最终生成的源代码中将不再包含 descriptorData 数据,也就不能使用 pbtk 自动还原对象结构。
我们以某 Android APP 为例来分析一下如何还原缺少描述信息的 protobuf 结构。
1
2
3
4
5
6
7
8
9
10
11
12
13
14
15
16
17
18
19
20
21
22
23
24
25
26
27
28
29
30
31
32
33
34
35
36
37
38
39
40
41
42
43
44
45
46
47
48
public final class GetPeerInfoRequest extends GeneratedMessageLite <GetPeerInfoRequest, b> implements MessageLiteOrBuilder { public static final int BITRATE_FIELD_NUMBER = 6 ; private static final GetPeerInfoRequest DEFAULT_INSTANCE; public static final int DEVICE_ID_FIELD_NUMBER = 1 ; public static final int EPISODE_ID_FIELD_NUMBER = 15 ; public static final int LIVE_SEGMENT_FIELD_NUMBER = 13 ; public static final int MANUSCRIPT_TYPE_FIELD_NUMBER = 18 ; public static final int NAT_TYPE_FIELD_NUMBER = 11 ; private static volatile Parser<GetPeerInfoRequest> PARSER = null ; public static final int PEER_NEED_COUNT_FIELD_NUMBER = 20 ; public static final int PLAY_TYPE_FIELD_NUMBER = 10 ; public static final int RESOURCE_AVID_FIELD_NUMBER = 9 ; public static final int RESOURCE_ID_FIELD_NUMBER = 2 ; public static final int RESOURCE_SIZE_FIELD_NUMBER = 4 ; public static final int RESOURCE_TYPE_FIELD_NUMBER = 3 ; public static final int RESOURCE_URL_FIELD_NUMBER = 12 ; public static final int SEASON_ID_FIELD_NUMBER = 14 ; public static final int SEGMENT_ID_FIELD_NUMBER = 8 ; public static final int SESSION_ID_FIELD_NUMBER = 5 ; public static final int SUB_SEGMENT_FIELD_NUMBER = 7 ; public static final int TRANS_ID_FIELD_NUMBER = 19 ; public static final int UPLOAD_PRIORITY_FIELD_NUMBER = 21 ; public static final int UPLOAD_UTC_TIMESTAMP_FIELD_NUMBER = 17 ; public static final int UP_MID_FIELD_NUMBER = 16 ; private int bitrate_; private long episodeId_; private int liveSegment_; private int manuscriptType_; private int natType_; private int peerNeedCount_; private int playType_; private long resourceSize_; private int resourceType_; private long seasonId_; private int segmentId_; private int sessionId_; private long upMid_; private int uploadPriority_; private long uploadUtcTimestamp_; private int subSegmentMemoizedSerializedSize = -1 ; private String deviceId_ = com.redacted.nativelibrary.b.d; private String resourceId_ = com.redacted.nativelibrary.b.d; private Internal.IntList subSegment_ = GeneratedMessageLite.emptyIntList(); private String resourceAvid_ = com.redacted.nativelibrary.b.d; private String resourceUrl_ = com.redacted.nativelibrary.b.d; private String transId_ = com.redacted.nativelibrary.b.d; }
这是一个叫做 GetPeerInfoRequest 的类,继承自 GeneratedMessageLite 类,实现了 MessageLiteOrBuilder 接口,MessageLite 是 protobuf 中提供的类,它不支持反射机制,因此也不包含描述信息。
观察这个类,发现存在大量 xxx_FIELD_NUMBER 的成员,另外还可以找到叫做 dynamicMethod 的函数
1
2
3
4
5
6
7
8
9
10
11
12
13
14
15
16
17
18
19
20
21
22
23
24
25
26
27
28
29
30
protected final Object dynamicMethod (GeneratedMessageLite.MethodToInvoke methodToInvoke, Object obj, Object obj2) { switch (a.a[methodToInvoke.ordinal()]) { case 1 : return new GetPeerInfoRequest (); case 2 : return new b (null ); case 3 : return GeneratedMessageLite.newMessageInfo(DEFAULT_INSTANCE, "\u0000\u0015\u0000\u0000\u0001\u0015\u0015\u0000\u0001\u0000\u0001Ȉ\u0002Ȉ\u0003\f\u0004\u0002\u0005\u0004\u0006\u0004\u0007'\b\u0004\tȈ\n\f\u000b\f\fȈ\r\u0004\u000e\u0002\u000f\u0002\u0010\u0002\u0011\u0002\u0012\f\u0013Ȉ\u0014\u0004\u0015\f" , new Object []{"deviceId_" , "resourceId_" , "resourceType_" , "resourceSize_" , "sessionId_" , "bitrate_" , "subSegment_" , "segmentId_" , "resourceAvid_" , "playType_" , "natType_" , "resourceUrl_" , "liveSegment_" , "seasonId_" , "episodeId_" , "upMid_" , "uploadUtcTimestamp_" , "manuscriptType_" , "transId_" , "peerNeedCount_" , "uploadPriority_" }); case 4 : return DEFAULT_INSTANCE; case 5 : GeneratedMessageLite.DefaultInstanceBasedParser defaultInstanceBasedParser = PARSER; if (defaultInstanceBasedParser == null ) { synchronized (GetPeerInfoRequest.class) { defaultInstanceBasedParser = PARSER; if (defaultInstanceBasedParser == null ) { defaultInstanceBasedParser = new GeneratedMessageLite .DefaultInstanceBasedParser(DEFAULT_INSTANCE); PARSER = defaultInstanceBasedParser; } } } return defaultInstanceBasedParser; case 6 : return (byte ) 1 ; case 7 : return null ; default : throw new UnsupportedOperationException (); } }
函数中调用 GeneratedMessageLite.newMessageInfo 的位置包含一个字符串数组,其中元素就是原始对象定义的各个变量名。
以 deviceId_ 为例,在类成员中找到 DEVICE_ID_FIELD_NUMBER = 1,说明在原始定义中存在一个叫做 deviceId 的变量,它对应编号为 1,接着找到 private String deviceId_ = com.redacted.nativelibrary.b.d;,说明 deviceId 变量应该是一个 string 类型。
这样就推测出原始 proto 对象肯定存在这样一条定义:string deviceId = 1;
按照这种模式将所有变量进行还原,由于数据具有较高的结构化程度,我们可以尝试利用 AI 实现自动化还原。
1
2
现在有一个经过 protoc 编译得到的 java 文件,请根据以下信息还原 proto 对象定义 <附加以上代码>
1
2
3
4
5
6
7
8
9
10
11
12
13
14
15
16
17
18
19
20
21
22
23
24
25
syntax = "proto3" ; message GetPeerInfoRequest { string device_id = 1 ; string resource_id = 2 ; int32 resource_type = 3 ; int64 resource_size = 4 ; int32 session_id = 5 ; int32 bitrate = 6 ; repeated int32 sub_segment = 7 ; int32 segment_id = 8 ; string resource_avid = 9 ; int32 play_type = 10 ; int32 nat_type = 11 ; string resource_url = 12 ; int32 live_segment = 13 ; int64 season_id = 14 ; int64 episode_id = 15 ; int64 up_mid = 16 ; int64 upload_utc_timestamp = 17 ; int32 manuscript_type = 18 ; string trans_id = 19 ; int32 peer_need_count = 20 ; int32 upload_priority = 21 ; }
最终结果可能和代码存在误差,不过大部分结构已经成功恢复。
Python 中的 Protobuf 还是以 SimpleMessage 为例,使用 protoc 编译后得到的文件则非常简单
1 2 3 4 5 6 7 8 9 10 11 12 13 14 15 16 17 18 19 20 21 22 """Generated protocol buffer code.""" from google.protobuf.internal import builder as _builderfrom google.protobuf import descriptor as _descriptorfrom google.protobuf import descriptor_pool as _descriptor_poolfrom google.protobuf import symbol_database as _symbol_database_sym_db = _symbol_database.Default() DESCRIPTOR = _descriptor_pool.Default().AddSerializedFile(b'\n\x0csimple.proto\x12\x0e\x65xample.simple\"Q\n\rSimpleMessage\x12\n\n\x02id\x18\x01 \x01(\x05\x12\x11\n\tis_simple\x18\x02 \x01(\x08\x12\x0c\n\x04name\x18\x03 \x01(\t\x12\x13\n\x0bsample_list\x18\x04 \x03(\x05\x62\x06proto3' ) _builder.BuildMessageAndEnumDescriptors(DESCRIPTOR, globals ()) _builder.BuildTopDescriptorsAndMessages(DESCRIPTOR, 'simple_pb2' , globals ()) if _descriptor._USE_C_DESCRIPTORS == False : DESCRIPTOR._options = None _SIMPLEMESSAGE._serialized_start=32 _SIMPLEMESSAGE._serialized_end=113
可以编写以下代码将描述信息进行解码
1
2
3
4
5
from google.protobuf.descriptor_pb2 import FileDescriptorProtoproto = FileDescriptorProto() proto.ParseFromString(b'\n\x0csimple.proto\x12\x0e\x65xample.simple\"Q\n\rSimpleMessage\x12\n\n\x02id\x18\x01 \x01(\x05\x12\x11\n\tis_simple\x18\x02 \x01(\x08\x12\x0c\n\x04name\x18\x03 \x01(\t\x12\x13\n\x0bsample_list\x18\x04 \x03(\x05\x62\x06proto3' ) print (proto)
由于 Python 的特性,在一定版本范围内可以直接通过工具反编译得到源代码,且经过测试发现是否指定 LITE_RUNTIME 模式似乎对生成的结果无影响,都能通过解析描述信息来还原原始结构。
C++ 中的 Protobuf 首先搭建一个编译环境用来生成测试程序,以下操作在 Windows 中进行。
搭建编译环境 系统要安装 Visual Studio、Cmake、git 工具,下载 protobuf 源代码 ,选择 Source Code 下载到本地并解压,然后打开刚刚解压出来的目录,在里面创建一个 build 文件夹,在 build 文件夹中新建一个 output 文件夹。
1 git clone https://github.com/abseil/abseil-cpp
等待克隆完毕之后,把 abseil-cpp 目录下的内容复制到外层目录。
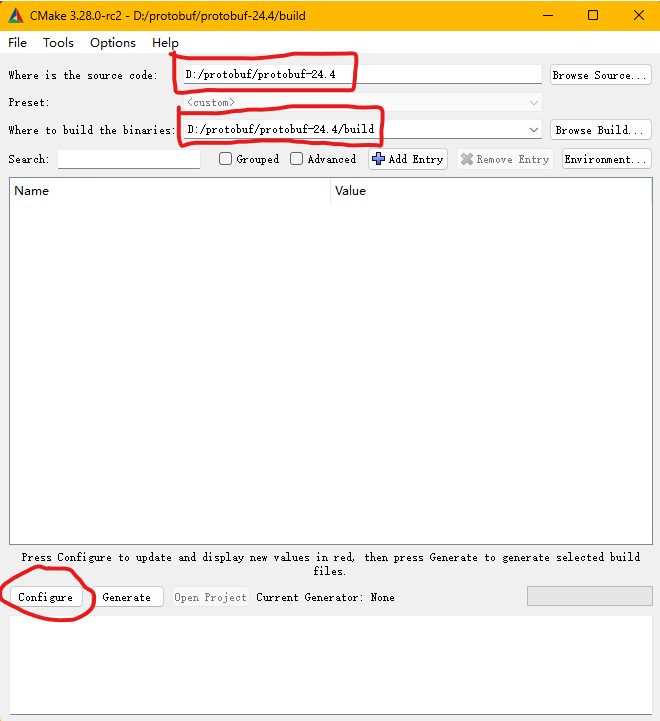
打开 Cmake GUI,源代码路径选择 protobuf 根目录,输出路径选择刚刚创建的 build 文件夹,然后点击 Configure
弹出的新窗口中架构输入 x64,点击完成。protobuf_BUILD_TESTS 项目,将勾选取消,同时修改 CMAKE_INSTALL_PREFIX 项目为 build/output。
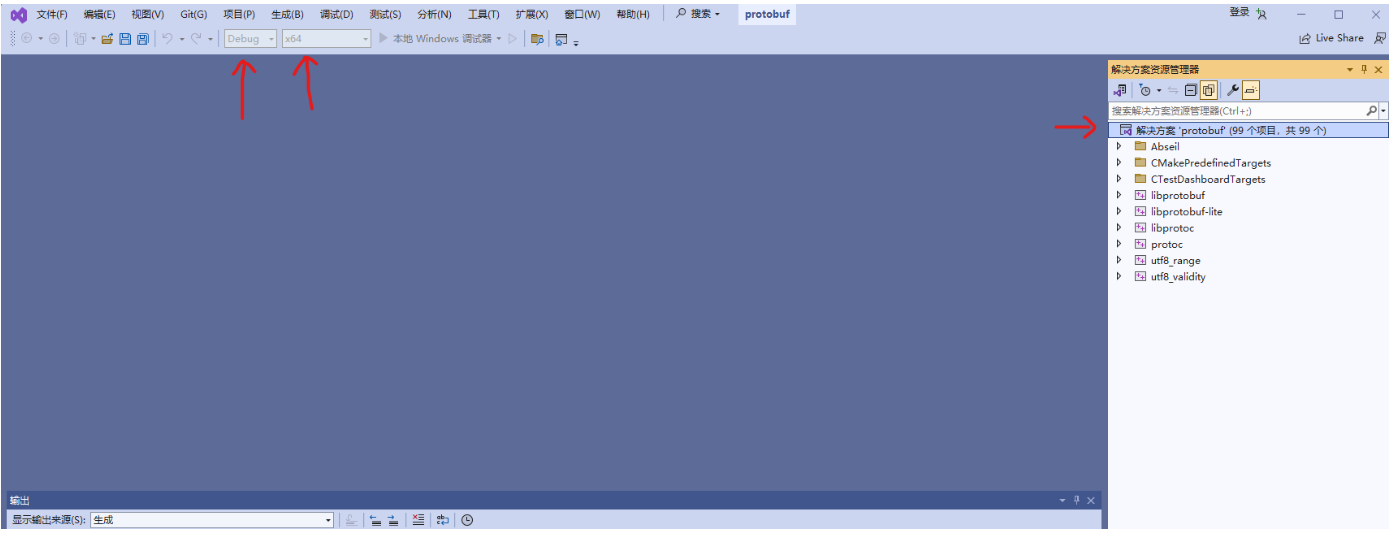
进入 build 目录,打开 protobuf.sln 解决方案,确保上方编译参数为 Debug、x64,在解决方案资源管理器中右键最上面的条目,选择生成解决方案,等待编译完成。
右键点击 CMakePredefinedTargets/INSTALL 条目,选择生成,等待安装完毕,在 build/output 目录下即可看到编译完成的链接库和 protoc.exe 编译器。
编写测试项目 新建一个 testProto.proto 文件,填写以下内容
1
2
3
4
5
6
7
8
syntax = "proto3" ; package mypb; message helloworld { optional int32 id = 1 ; optional string str = 2 ; optional int32 num = 3 ; }
这是一个测试结构,定义了一个 helloworld 对象,具有 3 个成员,id、str 和 num,把文件放在和 protoc.exe 相同目录下,用 protoc 编译
1 protoc.exe testProto.proto --cpp_out =.\
执行成功,会生成 testProto.pb.cc 和 testProto.pb.h 两个文件。可以打开这两个文件看看 proto 对象经过 protoc 处理后变成了什么样子,不过我们主要关心在逆向过程中如何恢复 proto 结构,所以先继续完成编译过程。
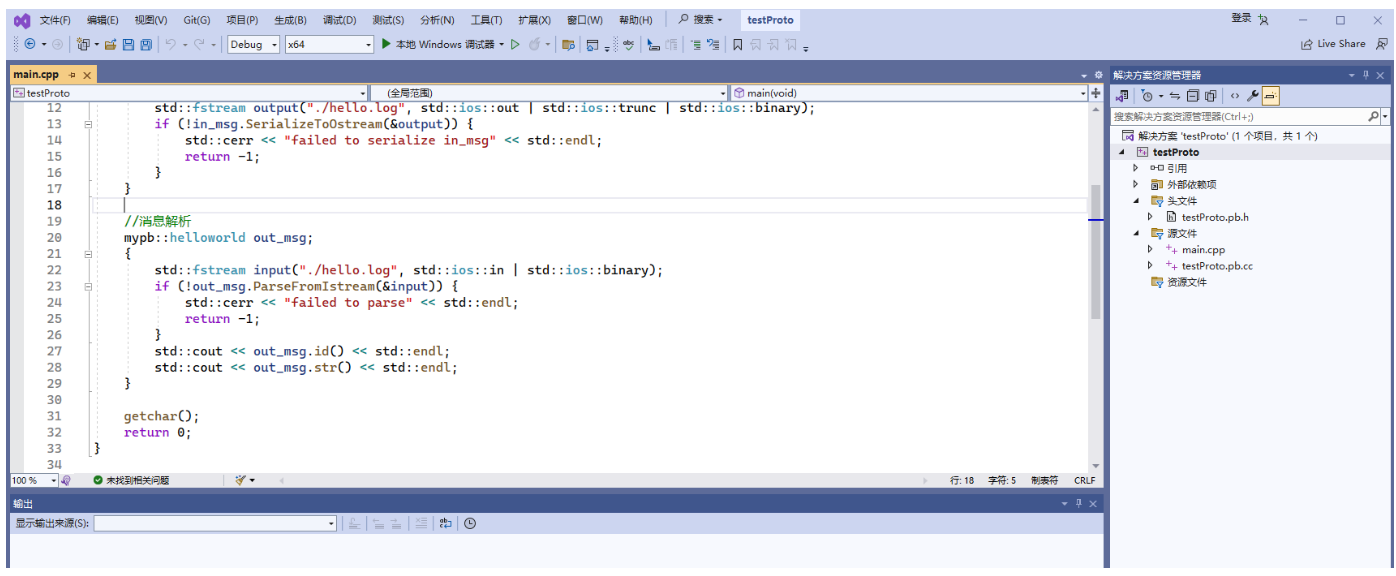
在 VS 中新建一个空白 C++ 项目,把这两个文件放在新项目的根目录下,打开项目,右侧解决方案管理器中分别将 testProto.pb.cc 和 testProto.pb.h 添加到 源文件、头文件,新建一个 main.cpp,填写以下内容
1 2 3 4 5 6 7 8 9 10 11 12 13 14 15 16 17 18 19 20 21 22 23 24 25 26 27 28 29 30 31 32 33 #include <iostream> #include <fstream> #include "testProto.pb.h" int main (void ) mypb::helloworld in_msg; { in_msg.set_id (9 ); in_msg.set_str ("Jack" ); std::fstream output ("./hello.log" , std::ios::out | std::ios::trunc | std::ios::binary) ; if (!in_msg.SerializeToOstream (&output)) { std::cerr << "failed to serialize in_msg" << std::endl; return -1 ; } } mypb::helloworld out_msg; { std::fstream input ("./hello.log" , std::ios::in | std::ios::binary) ; if (!out_msg.ParseFromIstream (&input)) { std::cerr << "failed to parse" << std::endl; return -1 ; } std::cout << out_msg.id () << std::endl; std::cout << out_msg.str () << std::endl; } getchar (); return 0 ; }
右键点击 testProto 项目,选择属性 -> C/C++ -> 常规,修改附加包含目录 ,填写 build/output/include,再选择链接器 -> 常规,修改附加库目录 ,填写 build/output/lib,选择链接器 -> 输入,修改附加依赖项 ,填写以下内容
1 libprotobufd.lib;libprotocd.lib;absl_bad_any_cast_impl.lib;absl_bad_optional_access.lib;absl_bad_variant_access.lib;absl_base.lib;absl_city.lib;absl_civil_time.lib;absl_cord.lib;absl_cord_internal.lib;absl_cordz_functions.lib;absl_cordz_handle.lib;absl_cordz_info.lib;absl_cordz_sample_token.lib;absl_crc32c.lib;absl_crc_cord_state.lib;absl_crc_cpu_detect.lib;absl_crc_internal.lib;absl_debugging_internal.lib;absl_demangle_internal.lib;absl_die_if_null.lib;absl_examine_stack.lib;absl_exponential_biased.lib;absl_failure_signal_handler.lib;absl_flags.lib;absl_flags_commandlineflag.lib;absl_flags_commandlineflag_internal.lib;absl_flags_config.lib;absl_flags_internal.lib;absl_flags_marshalling.lib;absl_flags_parse.lib;absl_flags_private_handle_accessor.lib;absl_flags_program_name.lib;absl_flags_reflection.lib;absl_flags_usage.lib;absl_flags_usage_internal.lib;absl_graphcycles_internal.lib;absl_hash.lib;absl_hashtablez_sampler.lib;absl_int128.lib;absl_kernel_timeout_internal.lib;absl_leak_check.lib;absl_log_entry.lib;absl_log_flags.lib;absl_log_globals.lib;absl_log_initialize.lib;absl_log_internal_check_op.lib;absl_log_internal_conditions.lib;absl_log_internal_fnmatch.lib;absl_log_internal_format.lib;absl_log_internal_globals.lib;absl_log_internal_log_sink_set.lib;absl_log_internal_message.lib;absl_log_internal_nullguard.lib;absl_log_internal_proto.lib;absl_log_severity.lib;absl_log_sink.lib;absl_low_level_hash.lib;absl_malloc_internal.lib;absl_periodic_sampler.lib;absl_random_distributions.lib;absl_random_internal_distribution_test_util.lib;absl_random_internal_platform.lib;absl_random_internal_pool_urbg.lib;absl_random_internal_randen.lib;absl_random_internal_randen_hwaes.lib;absl_random_internal_randen_hwaes_impl.lib;absl_random_internal_randen_slow.lib;absl_random_internal_seed_material.lib;absl_random_seed_gen_exception.lib;absl_random_seed_sequences.lib;absl_raw_hash_set.lib;absl_raw_logging_internal.lib;absl_scoped_set_env.lib;absl_spinlock_wait.lib;absl_stacktrace.lib;absl_status.lib;absl_statusor.lib;absl_str_format_internal.lib;absl_strerror.lib;absl_string_view.lib;absl_strings.lib;absl_strings_internal.lib;absl_symbolize.lib;absl_synchronization.lib;absl_throw_delegate.lib;absl_time.lib;absl_time_zone.lib;utf8_range.lib;utf8_validity.lib;%(AdditionalDependencies)
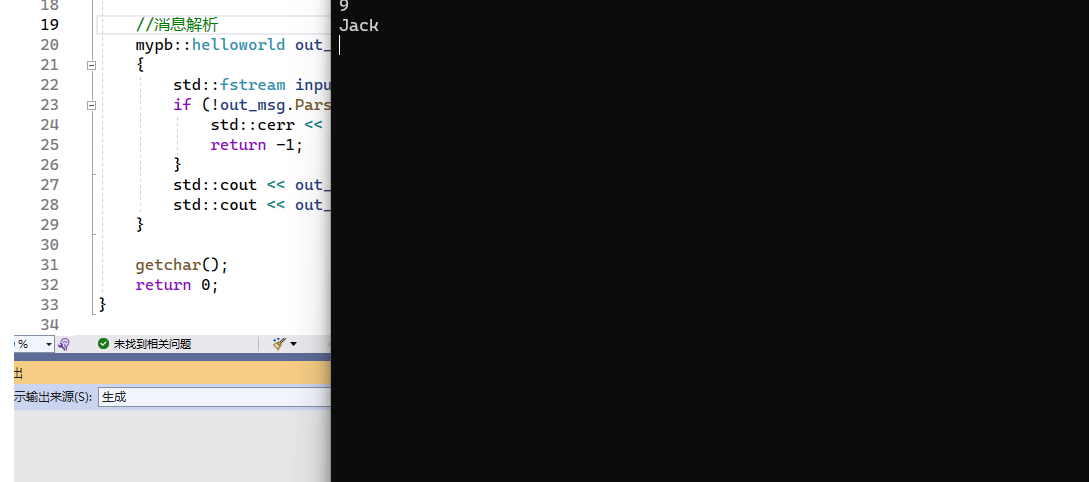
修改完成,点击确定,然后点击绿色箭头编译并执行 main.cpp
逆向分析程序 在项目的 x64/Debug 目录下找到生成的 testProto.exe 程序,使用 IDA 打开分析。根据字符串可以先找到主函数
1
2
3
4
5
6
7
8
9
10
11
12
13
14
15
16
17
18
19
20
21
22
23
24
25
26
27
28
29
30
31
32
33
34
35
36
37
38
39
40
41
42
43
44
45
46
47
48
49
50
51
52
53
54
55
56
57
58
59
60
61
62
63
64
65
__int64 sub_14035E010 () { v0 = &v12; for ( i = 222 i64; i; --i ) { *v0 = -858993460 ; v0 += 4 ; } sub_140326B0A(&unk_140CD0147); sub_1403100DF(v13); sub_14031213C(v13, 9 i64); sub_14031CDD0(v13, "Jack" ); sub_140322E8D(v14, 280 i64); sub_140323658(v14, "./hello.log" , 50 , 64 , 1 ); if ( v14 ) v21 = &v15; else v21 = 0 i64; if ( sub_14030D448(v13, v21) ) { sub_140321DF8(v14); sub_1403100DF(v16); sub_140322E8D(v17, 280 i64); sub_140323658(v17, "./hello.log" , 33 , 64 , 1 ); if ( sub_140328E1E(v16, v17) ) { v5 = sub_140322208(v16); v6 = sub_14030DE2A(&unk_140C57C50, v5); sub_140318221(v6, sub_14030A1EE); v7 = sub_14031FAA3(v16); v8 = sub_1403230EF(&unk_140C57C50, v7); sub_140318221(v8, sub_14030A1EE); sub_140321DF8(v17); sub_140320E3A(); v20 = 0 ; sub_14031BC23(v16); sub_14031BC23(v13); v3 = v20; } else { v4 = sub_14030BFD0(&qword_140C57DA0, "failed to parse" ); sub_140318221(v4, sub_14030A1EE); v19 = -1 ; sub_140321DF8(v17); sub_14031BC23(v16); sub_14031BC23(v13); v3 = v19; } } else { v2 = sub_14030BFD0(&qword_140C57DA0, "failed to serialize in_msg" ); sub_140318221(v2, sub_14030A1EE); v18 = -1 ; sub_140321DF8(v14); sub_14031BC23(v13); v3 = v18; } v9 = v3; sub_14032183F(v11, &unk_14096C300); return v9; }
由于编译导致信息丢失,反编译得到的代码和源代码有很大的区别,而且 protobuf 结构经过 protoc 编译之后会变成 C++ 中的一个类对象,再经过 C 编译器处理,大部分和原始对象有关的信息均已丢失。
和 JAVA 中的思路类似,当 proto 对象未采用 LITE_RUNTIME 模式编译时, 最终二进制程序内部包含描述信息,利用 pbtk 工具即可还原原始结构。
使用 from_binary.py 脚本得到的结果
1
2
3
4
5
6
7
8
9
10
11
12
13
14
15
16
17
syntax = "proto3" ; package mypb;message helloworld { oneof _id { int32 id = 1 ; } oneof _str { string str = 2 ; } oneof _num { int32 num = 3 ; } }
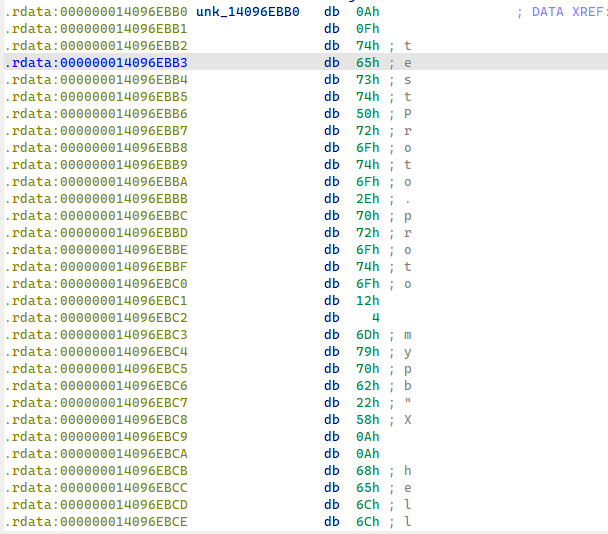
当程序不存在描述信息时,可以尝试寻找 proto 对象的 _InternalSerialize 函数。
1 2 3 4 5 6 7 8 9 10 11 12 13 14 15 16 17 18 19 20 21 22 23 24 25 26 27 28 29 30 31 32 33 34 35 36 37 38 ::uint8_t * helloworld::_InternalSerialize( ::uint8_t * target, ::google::protobuf::io::EpsCopyOutputStream* stream) const { ::uint32_t cached_has_bits = 0 ; (void )cached_has_bits; cached_has_bits = _impl_._has_bits_[0 ]; if (cached_has_bits & 0x00000002 u) { target = ::google::protobuf::internal::WireFormatLite:: WriteInt32ToArrayWithField <1 >( stream, this ->_internal_id(), target); } if (cached_has_bits & 0x00000001 u) { const std::string& _s = this ->_internal_str(); ::google::protobuf::internal::WireFormatLite::VerifyUtf8String ( _s.data (), static_cast <int >(_s.length ()), ::google::protobuf::internal::WireFormatLite::SERIALIZE, "mypb.helloworld.str" ); target = stream->WriteStringMaybeAliased (2 , _s, target); } if (cached_has_bits & 0x00000004 u) { target = ::google::protobuf::internal::WireFormatLite:: WriteInt32ToArrayWithField <3 >( stream, this ->_internal_num(), target); } if (PROTOBUF_PREDICT_FALSE (_internal_metadata_.have_unknown_fields ())) { target = ::_pbi::WireFormat::InternalSerializeUnknownFieldsToArray ( _internal_metadata_.unknown_fields <::google::protobuf::UnknownFieldSet>(::google::protobuf::UnknownFieldSet::default_instance), target, stream); } return target; }
函数中通过 cached_has_bits 来判断当前处理的是哪个成员,后续的 WireFormatLite::xxx 函数中又包含当前字段在原始定义中的顺序。
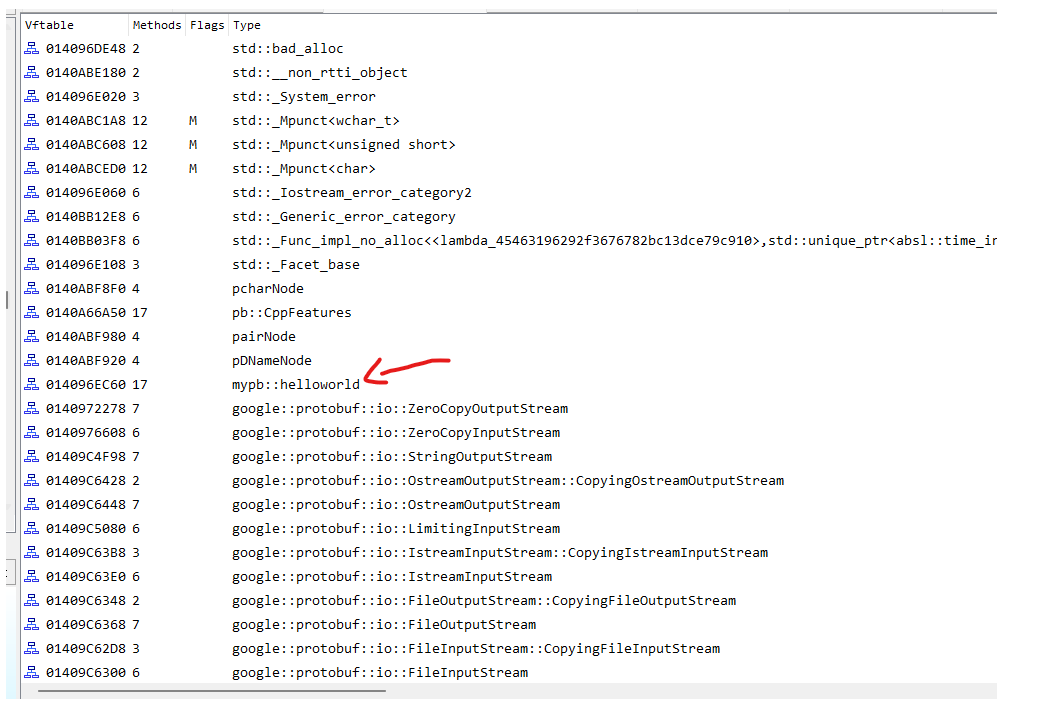
为了找到 _InternalSerialize 函数,首先要在程序中定位 proto 对象位置,C++ 程序中可能会留下很多 RTTI 结构,RTTI 是 C++ 中的一种特性,允许程序在运行时得知某个对象的信息。使用开源工具 https://github.com/rcx/classinformer-ida7 可以从程序中尝试还原这些信息。
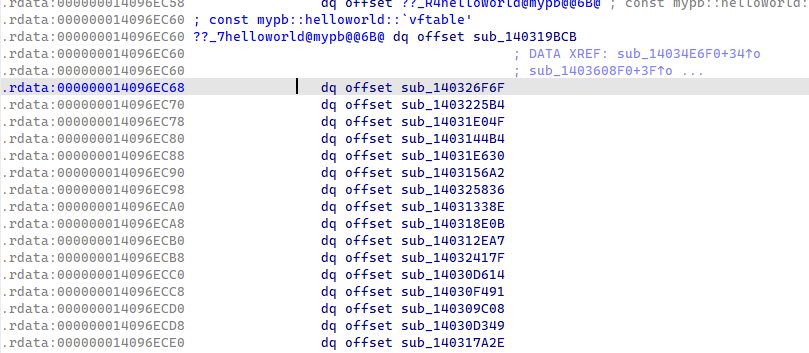
插件成功识别到了 helloworld proto 对象,双击来到对象位置,我们看到有 17 个方法
依次分析各个函数就能找到 _InternalSerialize 函数
1
2
3
4
5
6
7
8
9
10
11
12
13
14
15
16
17
18
19
20
21
22
23
24
25
26
27
28
29
30
31
32
33
34
35
36
37
__int64 __fastcall sub_14035EAB0 (__int64 a1, __int64 a2, __int64 a3) unsigned int v3; __int64 v4; unsigned int v5; __int64 v6; int v8; __int64 v9; unsigned int v10; sub_140326B0A (&unk_140CD02D2); v8 = *sub_140325A98 (a1 + 16 , 0 i64); if ( (v8 & 2 ) != 0 ) { v3 = sub_140309F23 (a1); a2 = sub_14032414D (a3, v3, a2); } if ( (v8 & 1 ) != 0 ) { v9 = sub_1403293E6 (a1); v10 = sub_14032223A (v9); v4 = sub_140315D46 (v9); sub_14030AC2A (v4, v10, 1 i64, "mypb.helloworld.str" ); a2 = sub_140314E96 (a3, 2 i64, v9, a2); } if ( (v8 & 4 ) != 0 ) { v5 = sub_140322CD5 (a1); a2 = sub_1403140EF (a3, v5, a2); } if ( sub_14032560B (a1 + 8 ) ) { v6 = sub_1403171AA (a1 + 8 , sub_14031FF6C); a2 = sub_14031A611 (v6, a2, a3); } return a2; }
对照源代码
1 2 3 4 5 6 7 8 9 10 11 12 13 14 15 16 17 18 19 20 21 22 23 24 25 26 27 28 29 30 31 32 33 34 35 36 37 38 ::uint8_t * helloworld::_InternalSerialize( ::uint8_t * target, ::google::protobuf::io::EpsCopyOutputStream* stream) const { ::uint32_t cached_has_bits = 0 ; (void )cached_has_bits; cached_has_bits = _impl_._has_bits_[0 ]; if (cached_has_bits & 0x00000002 u) { target = ::google::protobuf::internal::WireFormatLite:: WriteInt32ToArrayWithField <1 >( stream, this ->_internal_id(), target); } if (cached_has_bits & 0x00000001 u) { const std::string& _s = this ->_internal_str(); ::google::protobuf::internal::WireFormatLite::VerifyUtf8String ( _s.data (), static_cast <int >(_s.length ()), ::google::protobuf::internal::WireFormatLite::SERIALIZE, "mypb.helloworld.str" ); target = stream->WriteStringMaybeAliased (2 , _s, target); } if (cached_has_bits & 0x00000004 u) { target = ::google::protobuf::internal::WireFormatLite:: WriteInt32ToArrayWithField <3 >( stream, this ->_internal_num(), target); } if (PROTOBUF_PREDICT_FALSE (_internal_metadata_.have_unknown_fields ())) { target = ::_pbi::WireFormat::InternalSerializeUnknownFieldsToArray ( _internal_metadata_.unknown_fields <::google::protobuf::UnknownFieldSet>(::google::protobuf::UnknownFieldSet::default_instance), target, stream); } return target; }
反编译函数和源代码大体一致,首先,通过变量 v8(即 cached_has_bits) 我们知道这个 protobuf 对象应该有 3 个成员,接着要寻找成员 ID,对于 INT32 定义,比如 id 成员,在反编译中对应 v8 & 2 分支,进入 sub_14032414D 函数
1 2 3 4 5 __int64 __fastcall sub_14032414D (__int64 a1, __int64 a2, __int64 a3) { return sub_14035FBF0(a1, a2, a3); }
再进入 sub_14035FBF0 函数
1
2
3
4
5
6
7
8
__int64 __fastcall sub_14035FBF0 (__int64 a1, unsigned int a2, __int64 a3) { __int64 v7; sub_140326B0A(&unk_140CD0295); v7 = sub_14030A65D(a1, a3); return sub_14031923E(1 i64, a2, v7); }
可以看到 sub_14031923E 的第一个参数为 1。
再用 num 成员来验证,进入 sub_1403140EF 函数
1 2 3 4 5 __int64 __fastcall sub_1403140EF (__int64 a1, __int64 a2, __int64 a3) { return sub_14035FC70(a1, a2, a3); }
再进入 sub_14035FC70 函数
1
2
3
4
5
6
7
8
__int64 __fastcall sub_14035FC70 (__int64 a1, unsigned int a2, __int64 a3) { __int64 v7; sub_140326B0A(&unk_140CD0295); v7 = sub_14030A65D(a1, a3); return sub_14031923E(3 i64, a2, v7); }
sub_14031923E 函数的第一个参数为 3,符合原始定义。
而对于 str 参数,在外部的 sub_140314E96 函数中就可以看到第二个参数为 2,说明它的 ID 为 2。
我们再以某第三方程序为例,此程序由 C++ 编写,使用了 protobuf,且程序中不存在描述信息。
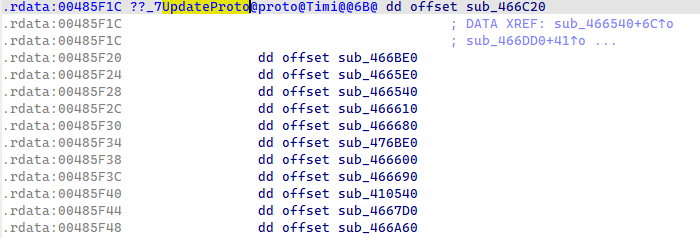
首先使用 classinformer 插件找到感兴趣的 proto 对象,例如 UpdateProto
依次分析这些函数,找到 _InternalSerialize 对应函数 sub_466A60
1
2
3
4
5
6
7
8
9
10
11
12
13
14
15
16
17
18
19
20
21
22
23
24
25
26
27
28
29
30
31
32
33
34
35
36
37
38
39
40
41
42
43
44
45
46
47
48
49
50
51
52
53
54
55
56
57
58
59
60
61
62
63
64
65
66
67
68
69
70
71
72
73
74
75
76
77
78
79
80
81
82
83
_BYTE *__thiscall sub_466A60 (_DWORD *this , _BYTE *a2, _DWORD *a3) v4 = this [2 ]; v15 = v4; if ( (v4 & 4 ) != 0 ) { v5 = a2; if ( a2 >= *a3 ) v5 = sub_477210 (a2); v6 = this [6 ]; *v5 = 8 ; v7 = sub_467D80 (v6, v6 >> 31 , v5 + 1 ); LOBYTE (v4) = v15; } else { v7 = a2; } if ( (v4 & 8 ) != 0 ) { if ( v7 >= *a3 ) v7 = sub_477210 (v7); v11 = this [7 ]; *v7 = 16 ; v7 = sub_467D80 (v11, HIDWORD (v11), v7 + 1 ); LOBYTE (v4) = v15; } if ( (v4 & 1 ) != 0 ) { v7 = (mk_string)(3 , (this [4 ] & 0xFFFFFFFE ), v7); LOBYTE (v4) = v15; } if ( (v4 & 2 ) != 0 ) { v7 = (mk_string)(4 , (this [5 ] & 0xFFFFFFFE ), v7); LOBYTE (v4) = v15; } if ( (v4 & 16 ) != 0 ) { if ( v7 >= *a3 ) v7 = sub_477210 (v7); v14 = this [9 ]; v12 = this [8 ]; *v7 = 0x28 ; v7 = sub_467D80 (v12, v14, v7 + 1 ); LOBYTE (v4) = v15; } if ( (v4 & 32 ) != 0 ) { if ( v7 >= *a3 ) v7 = sub_477210 (v7); v13 = this [10 ]; *v7 = 48 ; v7 = sub_467D80 (v13, HIDWORD (v13), v7 + 1 ); } if ( (this [1 ] & 1 ) != 0 ) { v8 = *((this [1 ] & 0xFFFFFFFC ) + 20 ); v16 = v8; if ( (this [1 ] & 1 ) != 0 ) { v9 = ((this [1 ] & 0xFFFFFFFC ) + 4 ); } else { if ( !byte_4B07A8 ) { sub_476550 (); v8 = v16; } v9 = &xmmword_4B07B0; } if ( *(v9 + 5 ) >= 0x10 u ) v9 = *v9; if ( *a3 - v7 < v8 ) return sub_477480 (v9, v8, v7); memcpy (v7, v9, v8); v7 += v16; } return v7; }
参考源代码中 _InternalSerialize 函数的基本结构,分析得知该对象应该具有 6 个变量,其中 1、2、5、6 号变量为 int 类型,3、4 号变量应为 string 类型。构造一个基本的对象数据并传入程序,通过调试可以验证以上分析是正确的。
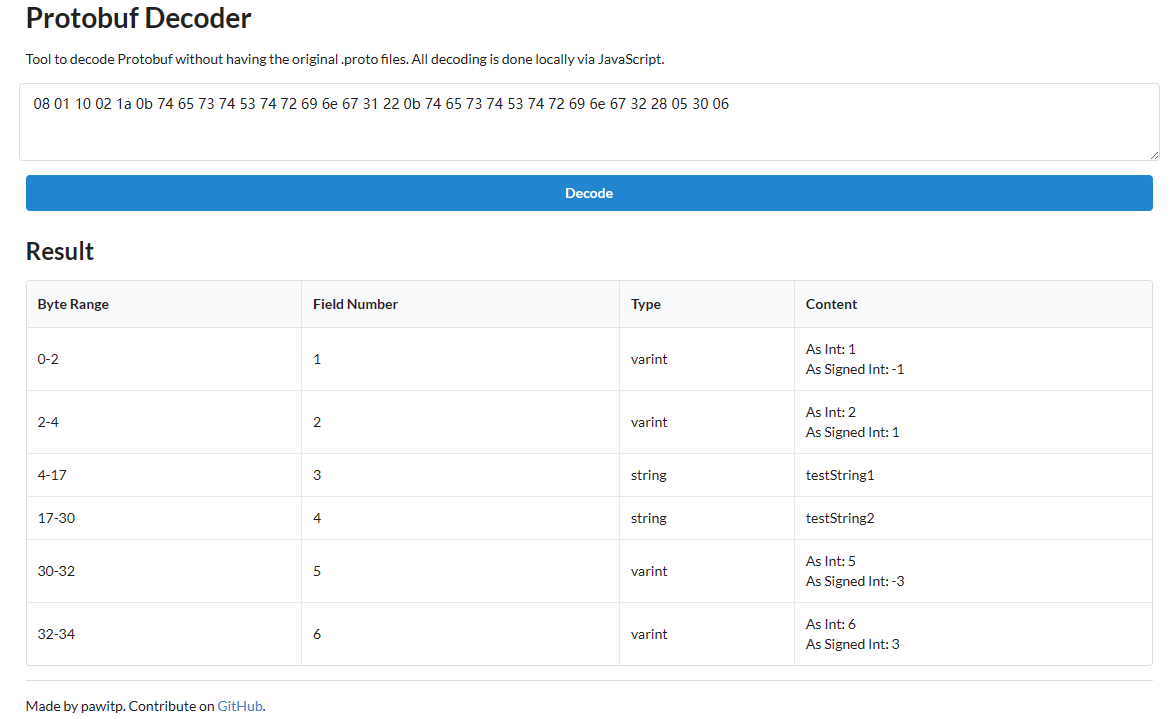
抓包分析 某些情况下能得到程序所使用的 protobuf 数据,比如上面的例子,假设通过抓包等方式获取了程序通讯过程中产生的数据
1 08 01 10 02 1a 0b 74 65 73 74 53 74 72 69 6e 67 31 22 0b 74 65 73 74 53 74 72 69 6e 67 32 28 05 30 06
此时可以用一些工具 直接将其解析
根据程序逻辑不断调整数据也许就能猜测出各个字段的功能,而无需原始 proto 对象定义。
本文介绍了在逆向过程中还原 protobuf 对象的几种方法,一个比较通用的思路就是使用对应语言先编译一个简单且已知的对象,然后从生成的源代码中找到能够识别对象的一些特征,再应用到待分析程序中尝试恢复对象结构,或者直接抓包并调试目标程序来辅助分析。
参考文章 https://www.cnblogs.com/davad/p/4871010.html
https://protobuf-decoder.netlify.app/
https://blog.csdn.net/qq_42067550/article/details/126010113
https://github.com/marin-m/pbtk
https://www.52pojie.cn/thread-1735973-1-1.html

