Array Networks vxAG 远程代码执行漏洞分析 (二)
本文为 Array Networks vxAG 远程代码执行漏洞分析的第二部分,主要介绍设备 License 和 VPN 安全问题。
License 正常导入设备后默认处于试用状态,只能使用部分基本功能,VPN 等功能需要导入合适的 License 之后才能开启。
(未导入 License 时,支持的功能为空)
(无法使用 VPN 功能)
正常来讲,我们需要获取试用版 License,或者分析验证逻辑,构造出合适的 License 来解锁各项功能,但是对于这款设备来说,有一种更方便的方法。
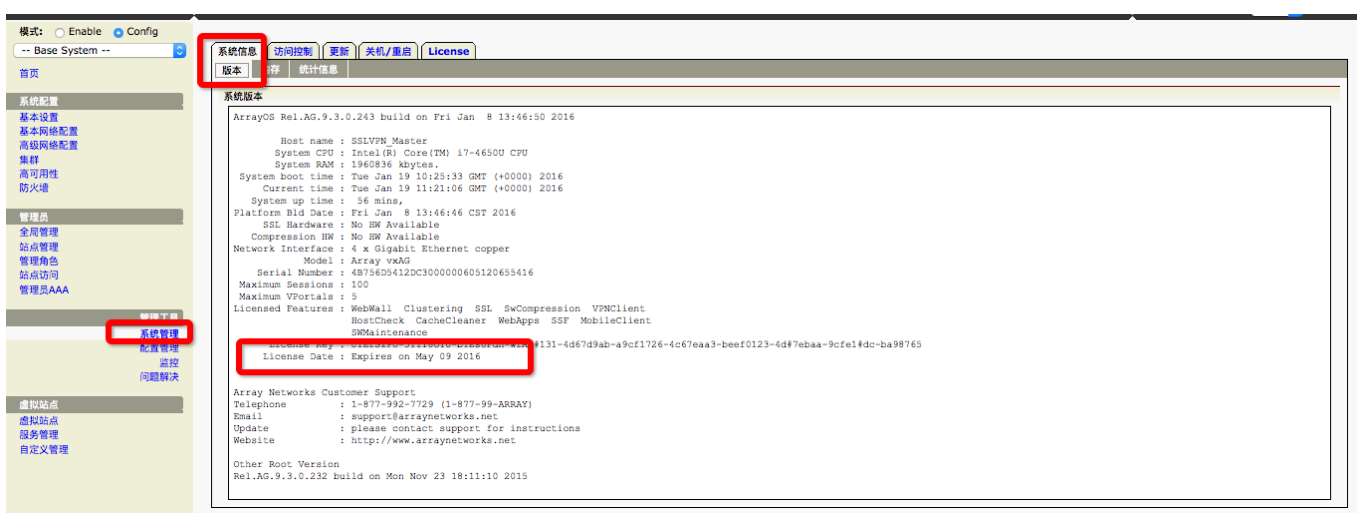
在某平台的设备帮助手册中,我找到了如下截图信息:
文档中介绍了如何部署设备以及激活 License,其中的截图包含一个已经过期的具有 VPN 模块授权的 License (J1ErSzPo-3TiY8OYU-bTEsUFdn-wfA=#131-4d67d9ab-a9cf1726-4c67eaa3-beef0123-4d#7ebaa-9cfe1#dc-ba98765),到期时间为 2016 年 5 月 9 日。考虑能否直接将这个 License 导入设备中呢?
尝试修改时间之后导入 License,设备会报 License 非法错误:
猜测每个 License 对应一个设备的序列号,截图中对应的序列号为:4B756D5412DC3000000605120655416,想要导入 License 的话可以考虑修改设备序列号,或者简单分析一下 License 验证逻辑。
首先定位到验证逻辑的入口点:class.cliWrap_gLicense.php
1
2
3
4
5
6
7
8
9
10
11
12
13
14
15
case ($this ->classId . '_gLicenseImportValidate' ): $t_licenseCode = $_POST [$this ->classId . '_license_code' ]; $t_errStr = cli::exec ('system license "' . $t_licenseCode . '"' ); if (!($t_errStr ->result)) { $this ->jsOnLoadEnd .= 'g_errStr += "' . language::translate ('alert_messageAlertFromSP' ) . '\n\n' . (urldecode (str_replace ('%0A' , '\n' , urlencode (addslashes (cli::get_reason_info ($t_errStr )))))) . '";' ; } else { $t_result = 'License Key verification succeeded' ; if (strstr ($t_errStr ->content[0 ], "SVD is not licensed on this system" ) != "" ) { $t_result .= "<br>The SVD function has been disabled automatically because it is not included in this new license." ; } $this ->jsOnLoadEnd .= 'showSPMessage("status", "' . language::translate ('status_operation_successful' ) . '<br><br>' . $t_result . '");' ; } break ;
代码会调用 system license CLI 命令验证 License 内容。全局搜索之前的报错信息,发现其出现在 /ca/bin/backend 二进制中。
简单分析逻辑,set_license 函数负责检查和设置 License,其中会调用 decode_actkey 函数来解码 License 内容。
1
2
3
4
5
6
7
8
9
10
11
12
13
14
15
16
17
18
19
20
21
22
23
24
25
26
27
28
29
30
31
32
33
34
35
36
37
38
39
40
41
42
43
44
45
46
47
48
49
50
51
52
53
54
55
56
57
58
59
60
61
62
63
64
65
66
67
68
69
70
71
72
73
74
75
76
77
78
79
80
81
82
83
84
85
86
87
88
89
90
91
92
93
94
95
96
97
98
99
100
101
102
103
104
105
106
107
108
109
110
111
112
113
114
115
116
117
118
119
120
121
122
123
124
125
126
127
128
129
130
131
132
133
134
135
136
137
138
139
int __fastcall decode_actkey (const char *licensekey, feactl_t *feactl_p, int show_flag, int *days) { byte *v6; unsigned int *v7; int v8; int v9; int v10; unsigned int (__fastcall *v11) (struct tm *) ; int v12; unsigned __int64 v13; char *v14; char *v15; int v16; int v17; int v18; __int64 v19; __int64 v20; unsigned __int64 v21; unsigned __int64 v22; time_t v23; func_t *v24; unsigned int v25; bool v29; char *dest; _BOOL4 v31; byte *serial_num; struct tm tp ; char nptr[8 ]; __int16 v35; __int64 v36; char s2[4 ]; char v38; uint32_t site2site_max_tunnels; int tmp_model_id; if_info if_info; license_bits_t feature; int session; int vblade; int model_idx; int version; char date_str[10 ]; char temp[100 ]; char field[100 ]; char key[256 ]; size_t len; uint64_t physmem[8 ]; tmp_model_id = -1 ; site2site_max_tunnels = 0 ; v29 = feactl_p == 0LL ; if ( !feactl_p || !licensekey ) return -1 ; license_debug_log("(%s): Original license key is %s" , "decode_actkey" , licensekey); memset (key, 0 , sizeof (key)); snprintf (key, 0x100 uLL, "%s" , licensekey); unmask_license_key(key); license_debug_log("(%s): The unmasked license key is %s" , "decode_actkey" , key); get_field(key, "#01" , field, 100 ); memset (temp, 0 , sizeof (temp)); strncpy (temp, &field[4 ], 2uLL ); sscanf (temp, "%x" , &model_idx); if ( string_to_feature_bits(&field[22 ], feature) ) { license_debug_log("(%s): Failed to parse feature bits" , "decode_actkey" ); if ( show_flag ) { ui_printf("%s--failed to parse feature bits\n" , "decode_actkey" ); return -1 ; } return -1 ; } license_debug_log("(%s): Get feature value 0x%x, 0x%x" , "decode_actkey" , feature[0 ], feature[1 ]); if ( (feature[1 ] & 0x20000 ) != 0 ) serial_num = get_avx_serial_num(); else serial_num = get_serial_num(); if ( check_vx_arrayid_valid() < 0 ) { if ( SLOBYTE(feature[0 ]) >= 0 && (feature[1 ] & 0x20000 ) == 0 ) { license_debug_log("(%s): The machine signature authentication failed!\n" , "decode_actkey" ); if ( show_flag ) { ui_printf("The hardware signature has changed, please reset your serial number using CLI 'system serialnumber'\n" ); return -1 ; } return -1 ; } gen_serialnum_vol(); } dest = feactl_p->company_name; *feactl_p->company_name = 0LL ; *&feactl_p->company_name[8 ] = 0 ; if ( SLOBYTE(feature[0 ]) >= 0 || model_idx == 6 ) { if ( !serial_num ) { license_debug_log("(%s) :Can not find serial number" , "decode_actkey" ); return -1 ; } } else { v6 = malloc (0x20 uLL); if ( !v6 ) { license_debug_log("Cannot read serial number: Error in memory allocation" ); license_debug_log("(%s) :Can not find serial number" , "decode_actkey" ); return -1 ; } serial_num = v6; *(v6 + 3 ) = 0LL ; strcpy (v6, "9999999999999999999999999999999" ); memset (field, 0 , sizeof (field)); if ( get_field(key, "#07" , field, 100 ) ) { license_debug_log( "(%s): VOLUME LICENSING feature is enabled, but #07 field does not exist in the license key" , "decode_actkey" ); return -1 ; } license_debug_log("(%s): Get value of #07 (%s)" , "decode_actkey" , field); memset (temp, 0 , sizeof (temp)); strncpy (temp, &field[3 ], 8uLL ); strcpy (dest, temp); feactl_p->company_name[8 ] = 0 ; if ( init_grace_period() ) license_debug_log("(%s): Initialize Grace Period Failed" , "decode_actkey" ); } if ( verify_license_hash(key, serial_num) != 1 ) { license_debug_log("The license key failed authentication check" ); if ( show_flag ) ui_printf("The license key failed authentication check\n" ); free (serial_num); return -1 ; } }
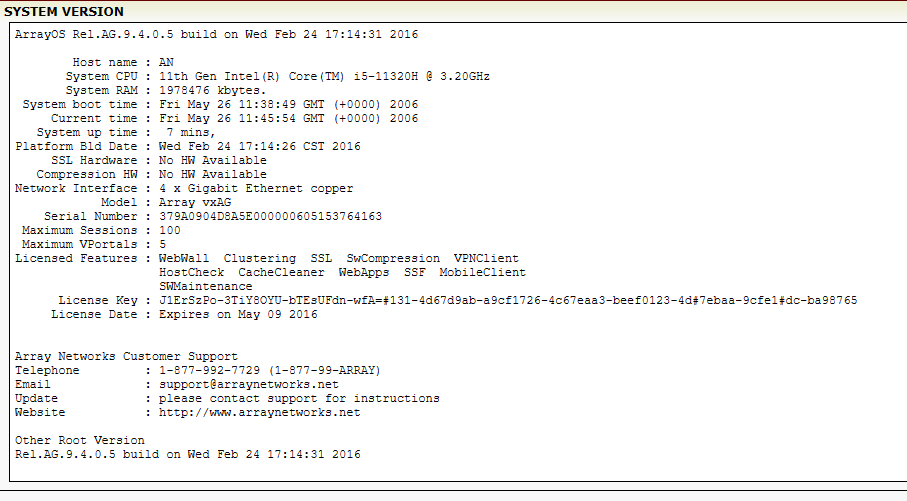
观察到关键的验证函数是 verify_license_hash,如果它的返回值不为 1,则表示验证失败。我们采取简单的破解方法,将此处判断取反,保存 patch 后覆盖到系统文件中。重新启动设备,先执行命令 date 200605261145 修改掉系统时间,然后再导入 License:
这样子就成功激活了 VPN 等功能。
VPN 配置 参考以下流程来配置 VPN 功能
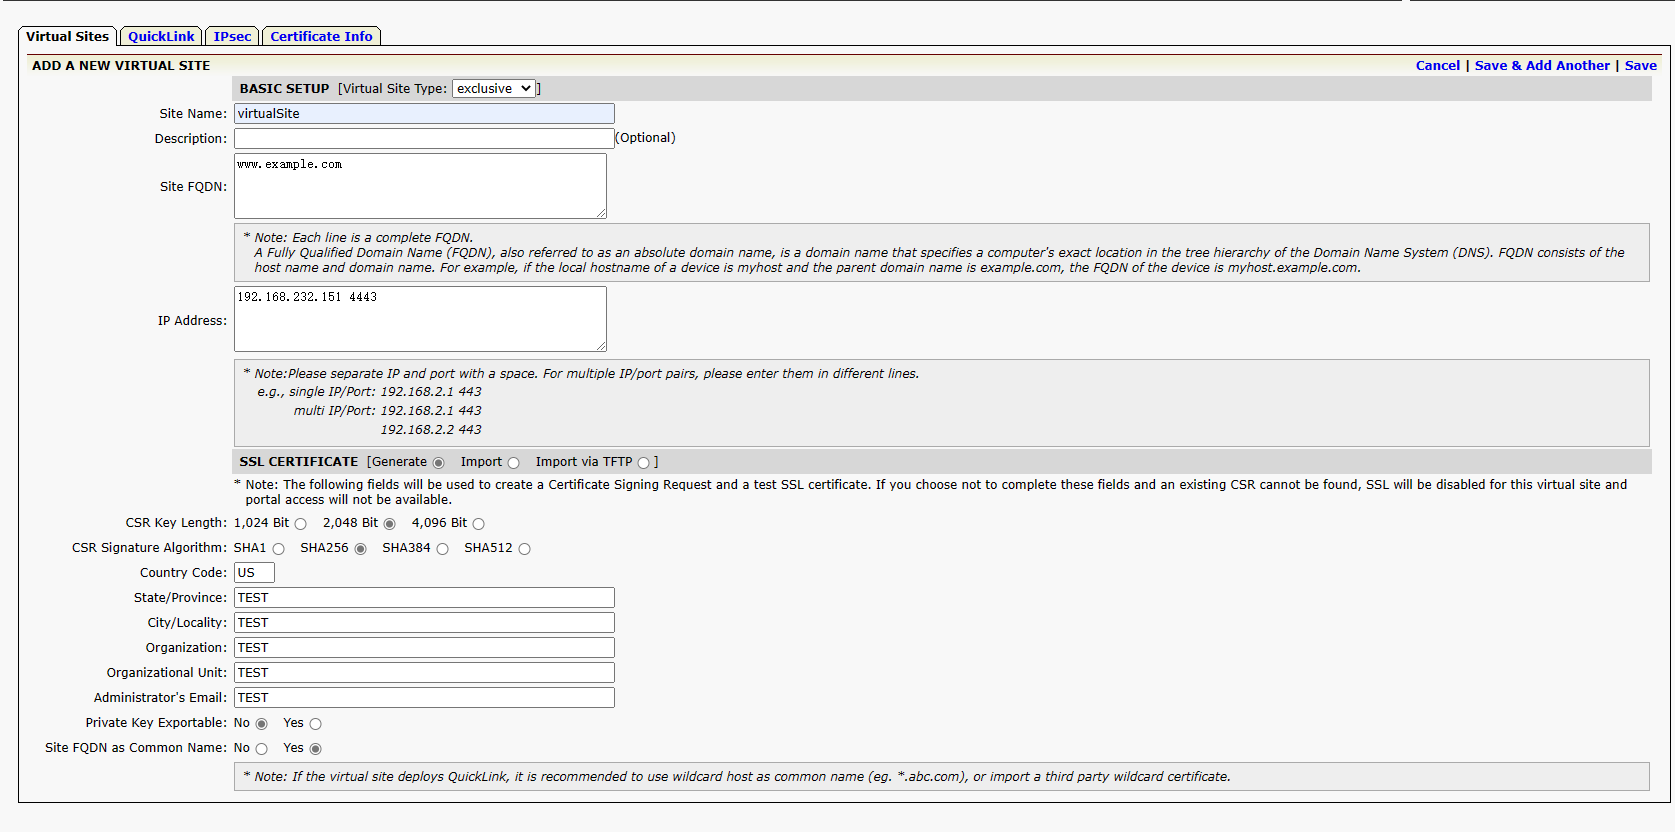
添加虚拟站点
Virtual Sites -> Add
各项配置根据实际情况填写,注意 IP 地址和端口的配置,点击保存。
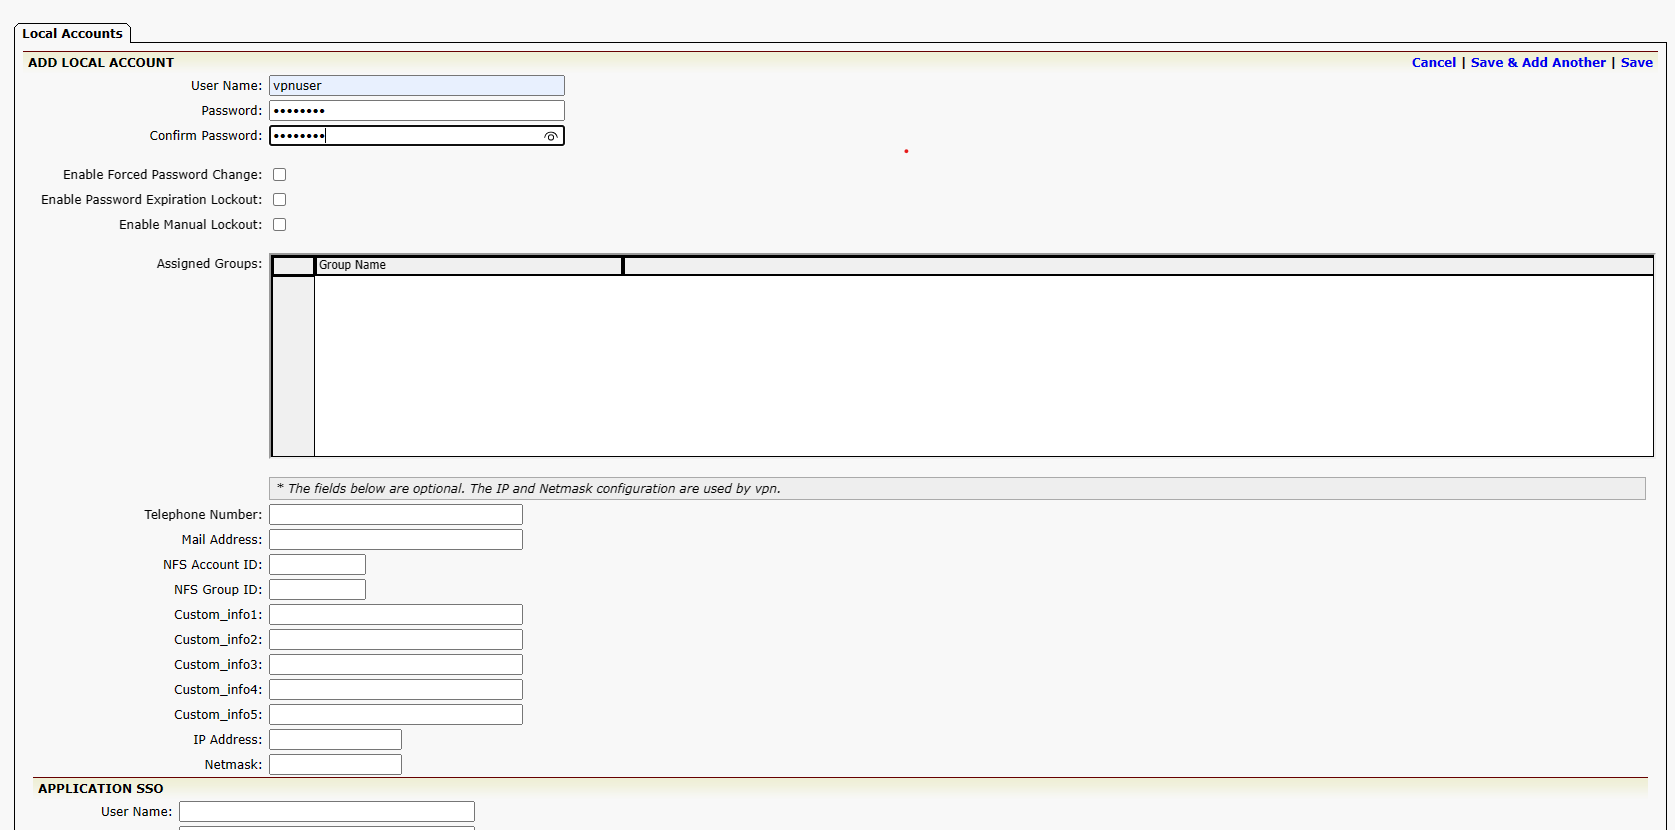
添加账户
双击刚刚添加的虚拟站点条目,切换到虚拟站点菜单
Local Accounts -> Add
填写用户名和密码即可。
执行以上操作后访问之前配置的端口即可看到 VPN 界面:
虽然还缺少一些配置信息,但足以用于展开各项测试。
漏洞分析 本文要介绍存在于 VPN 功能中的一个远程代码执行漏洞,在当前版本(9.4.0.5)测试成功,在较新版本中似乎也存在,最新版本中应该已经被修复。
通过检索响应头等信息,发现 uproxy 程序,此程序是类似 nginx 的代理服务器,其内部会处理一些请求,另外一部分请求会被转发到其他服务中。
stage_classify_url 函数是请求分发的入口点,先调用 sec_content_search 函数,尝试匹配 URI,最终实现函数为 patricia_insearch
1 v19 = patricia_insearch(content_tree, url_host_buf, v13 - 1 , 2u );
这个函数将用户发送的 URI 和 content_tree 全局结构体中保存的进行比较,通过交叉引用找到 content_tree 结构体初始化位置
1 sysctlbyname("net.inet.clicktcp.content_tree_ptr" , &content_tree, &v302, 0LL , 0LL )
这里本质上是读取内核中的配置信息,我们可以在命令行中读取到对应内容
1
2
# /sbin/sysctl -a | grep content_tree net.inet.clicktcp.content_tree_ptr: 18446742975201514048
该结构位于内核某个地址,在当前版本中,这个结构保存了很多条路由信息,每个路由对应编号和 flag,后续代码的 switch 结构会根据编号对路由进行处理。当 flag 等于 13 时表示此路由为 public request,请求会被转发到监听于 127.0.0.1:80 的 lighttpd web 服务中。
当请求 URI 不属于这 211 条路由时,stage_classify_url 还有一些特殊处理
1 2 3 4 5 6 7 8 9 10 11 12 13 14 15 16 17 18 19 if ( !memcmp (v18, "/motionpro/postlogin/cv" , 0x17 uLL) || !memcmp (v18, "/motionpro/postlogin/bookmark" , 0x1D uLL) ) { req->flags[1 ] |= 0x200000000000 uLL; goto LABEL_18; } if ( !memcmp (v18, "/motionpro/postlogin/apps" , 0x19 uLL) ) { req->flags[1 ] |= 0x400000000000 uLL; goto LABEL_18; } if ( !memcmp (v18, "/motionpro/postlogin/getDesc/" , 0x1D uLL) ) { req->flags[1 ] |= 0x100000000000 uLL; goto LABEL_18; } if ( memcmp (v18, "/secimg" , 7uLL ) ) goto LABEL_18;
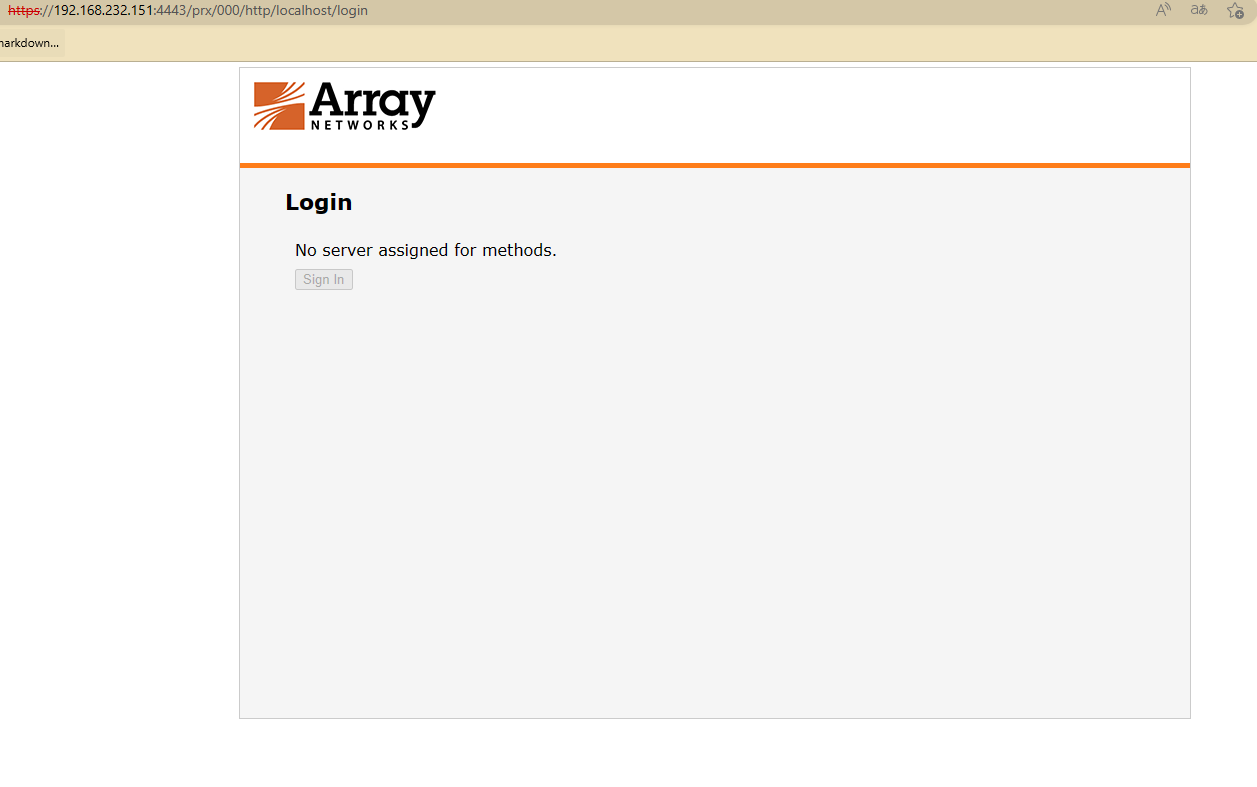
逐步分析各个 URI,可以找到一个叫做 /client_sec 的接口,这是一个 public request,请求会被直接转发到 lighttpd 中。
通过 ps 看到 lighttpd 启动命令,定位到配置文件:/ca/fileshare/httpd.conf
1
2
3
4
5
6
7
8
9
10
11
12
13
14
15
16
17
18
19
20
21
22
23
24
25
26
27
28
29
30
31
32
33
34
35
36
37
38
39
40
41
42
43
44
45
46
47
48
49
50
51
52
53
54
55
56
57
58
59
60
61
62
63
64
65
66
67
68
69
70
71
72
73
74
75
76
77
78
79
80
81
82
83
84
85
86
87
88
89
90
91
92
93
94
95
96
97
server.modules = ( "mod_access", "mod_accesslog", "mod_rewrite", "mod_cgi" ) cgi.assign = ( "/cifs" => "/usr/bin/perl", "/delete" => "/usr/bin/perl", "/rename" => "/usr/bin/perl", "/upload" => "/usr/bin/perl", "/move" => "/usr/bin/perl", "/addfolder" => "/usr/bin/perl") server.document-root = "/ca/fileshare/htdocs" server.username = "nobody" server.groupname = "nobody" server.pid-file = "/ca/fileshare/logs/lighttpd.pid" server.event-handler = "freebsd-kqueue" ## bind to localhost (default: all interfaces) $SERVER["socket"] == "2.255.255.249:80" { server.port = 80 server.bind = "2.255.255.249" } $SERVER["socket"] == "127.0.0.1:80" { server.port = 80 server.bind = "127.0.0.1" } server.tag ="lighttpd" #server.errorlog = "/ca/fileshare/logs/error.log" server.errorlog-use-syslog = "enable" #accesslog.filename = "/ca/fileshare/logs/access.log" accesslog.use-syslog = "enable" # mimetype mapping mimetype.assign = ( ".pdf" => "application/pdf", ".sig" => "application/pgp-signature", ".spl" => "application/futuresplash", ".class" => "application/octet-stream", ".ps" => "application/postscript", ".torrent" => "application/x-bittorrent", ".dvi" => "application/x-dvi", ".gz" => "application/x-gzip", ".pac" => "application/x-ns-proxy-autoconfig", ".swf" => "application/x-shockwave-flash", ".tar.gz" => "application/x-tgz", ".tgz" => "application/x-tgz", ".tar" => "application/x-tar", ".zip" => "application/zip", ".mp3" => "audio/mpeg", ".m3u" => "audio/x-mpegurl", ".wma" => "audio/x-ms-wma", ".wax" => "audio/x-ms-wax", ".ogg" => "audio/x-wav", ".wav" => "audio/x-wav", ".gif" => "image/gif", ".jpg" => "image/jpeg", ".jpeg" => "image/jpeg", ".png" => "image/png", ".xbm" => "image/x-xbitmap", ".xpm" => "image/x-xpixmap", ".xwd" => "image/x-xwindowdump", ".css" => "text/css", ".html" => "text/html", ".htm" => "text/html", ".js" => "text/javascript", ".asc" => "text/plain", ".c" => "text/plain", ".conf" => "text/plain", ".text" => "text/plain", ".txt" => "text/plain", ".dtd" => "text/xml", ".xml" => "text/xml", ".mpeg" => "video/mpeg", ".mpg" => "video/mpeg", ".mov" => "video/quicktime", ".qt" => "video/quicktime", ".avi" => "video/x-msvideo", ".asf" => "video/x-ms-asf", ".asx" => "video/x-ms-asf", ".wmv" => "video/x-ms-wmv", ".bz2" => "application/x-bzip", ".tbz" => "application/x-bzip-compressed-tar", ".tar.bz2" => "application/x-bzip-compressed-tar" ) Index-file.names = ( "index.html" )
发送 /client_sec 请求时可以访问到位于 /ca/fileshare/htdocs/client_sec 下的文件,例如发送以下请求:
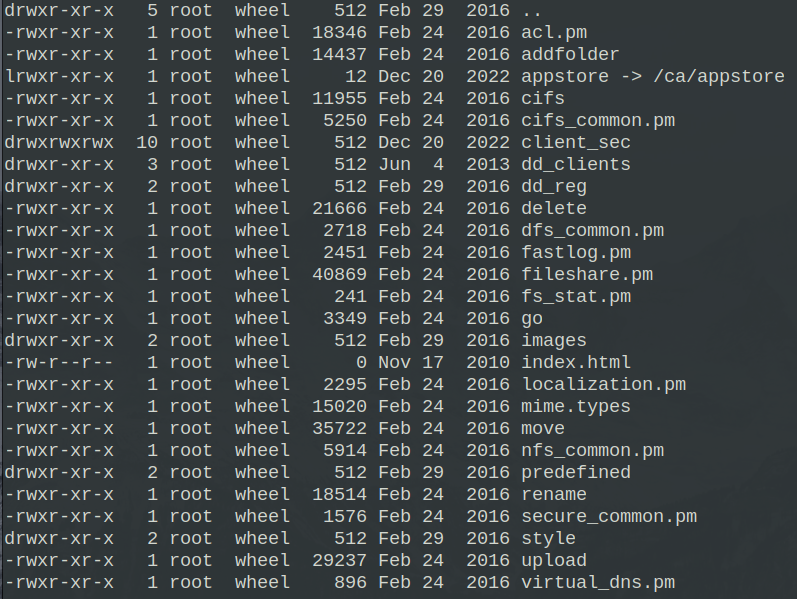
/client_sec 目录下有一些资源文件,但重点不在这里。我们考虑既然可以访问 /ca/fileshare/htdocs/client_sec 下的文件,那么能否通过路径穿越等手段访问到位于 /ca/fileshare/htdocs 下的文件呢?因为 /ca/fileshare/htdocs 目录下存放了一些 perl 脚本文件,结合 lighttpd 开启了 cgi 支持,如果可以访问这些文件的话就可以调用其中的功能。
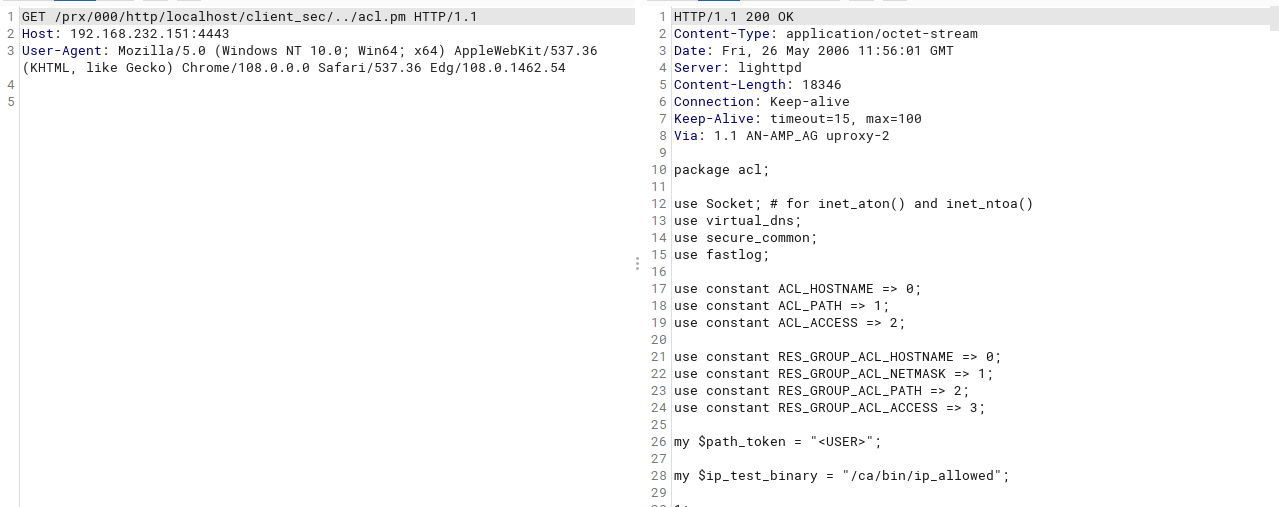
我们构造请求测试:
通过在 URL 中添加路径穿越字符,确实可以访问到上一层的文件。(直接访问 /prx/000/http/localhost/acl.pm 会由于代理服务器返回 302)
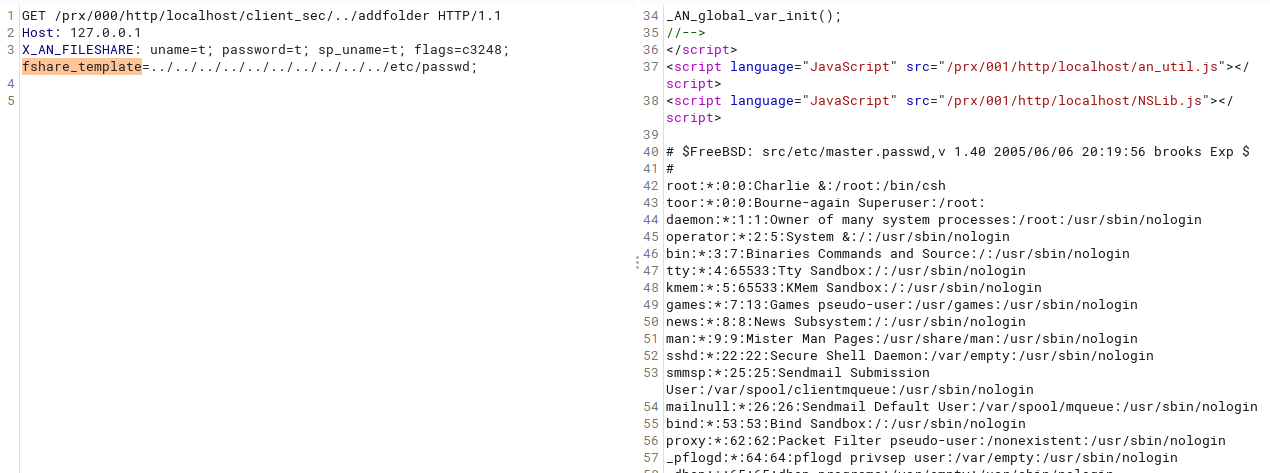
不过以 .pm 结尾的文件服务器并不会执行,而是直接返回其内容,尝试访问无拓展名的脚本如 addfolder:
这样脚本中的内容就被执行了,我们可以分析这些 perl 代码中是否存在问题。下面列举一个漏洞:
在 addfolder 中存在这样的代码
1 2 3 4 $kvars{'uid' } = -1 ; $kvars{'gid' } = -1 ; &fileshare::read_kernel_parameters(\%ENV, \%kvars);
read_kernel_parameters 函数的定义:
1
2
3
4
5
6
7
8
9
10
11
12
13
14
15
16
17
18
19
20
21
22
23
24
25
26
27
28
29
my $fileshare_header = "HTTP_X_AN_FILESHARE" ;sub read_kernel_parameters my ($env, $kvars) = @_; my $header = $env->{$fileshare_header}; my @pairs = split (/; ?/ , $header); foreach (@pairs) { my ($name, $value) = split ("=" , $_); if ($name eq "acls" ) { my @acls; &read_acls($value, \@acls); $kvars->{$name} = \@acls; } elsif ($name eq "res_group_acls" ) { my @res_group_acls; &read_res_group_acls($value, \@res_group_acls); $kvars->{$name} = \@res_group_acls; } else { $kvars->{$name} = &uri_unescape($value); } } }
我们发现 kvars 参数中的内容实际上是用户请求头 X_AN_FILESHARE 中的各项参数,代码中用注释列举了可能的 X_AN_FILESHARE 请求头格式。
回到 addfolder,当请求类型不为 POST 时,会调用 fileshare::displayInfo 函数
1
2
3
4
5
6
7
8
9
10
11
12
13
14
15
16
17
18
19
20
21
22
23
24
25
26
27
28
29
30
31
32
sub displayInfo my ($page, $kvars, $title, $message, $caller_name, $caller_href) = @_; my $charset = &localization::msg('charset' ) || 'UTF-8' ; if (&is_login_failure($message)) { print $page->header(-type => "text/html; charset=${charset} " , -status => "401 Access Denied" , -WWW_Authenticate => "_AN_fshare" ); } elsif ($message =~ m/^FATAL_ERROR_/ ) { $message =~ s/^FATAL_ERROR_// ; $message =~ s/\sat\s.*// ; } else { print $page->header(-type => "text/html; charset=${charset} " ); } my %html_data = &read_template(hex ($kvars->{'flags' }), $kvars->{'change_url' }, $title, $kvars->{'fshare_template' }); my $top_html = $html_data{'top_html' }; my $end_html = $html_data{'end_html' }; if ($top_html eq "" ) { &last_ditch_error($page, &localization::msg(1 )); exit 1 ; } my $message_html = &generate_info($title, $message, $caller_name, $caller_href); print $top_html; print $message_html; print $end_html; }
代码会使用 is_login_failure 函数鉴权,无论是否通过,后面都会调用 read_template 函数尝试读取一个 HTML 模板文件,这个函数的参数是用户可控的。
1
2
3
4
5
6
7
8
9
10
11
12
13
14
15
16
17
sub read_template my ($flags, $reset_pwd_url, $title, $ai_template) = @_; my $template = "" ; my $top_html = "" ; my $end_html = "" ; my %html_data = ('top_html' => "" , 'end_html' => "" ); if ($ai_template) { $ai_template = "/ca/fileshare/htdocs/" . $ai_template; if (!open (TEMPLATE, "<$ai_template" )) { return %html_data; } } }
我们看到代码会使用第四个参数即 fshare_template 拼接一个路径,然后打开对应的文件读取并使用其中内容,期间缺少对数据的过滤,通过构造路径穿越 payload 可以读取一些敏感文件。
类似的“小问题”还有很多,限于篇幅我们只介绍其中一个。除这些小问题之外,我们希望有一种办法能实现远程代码执行。
参考perl 代码审计 文章,在 perl 中除常规的 system、exec 之外,open 函数也可以执行系统命令,只需要在路径的最后添加一个 | 字符。在设备的 perl 代码库中查询相关风险点,似乎只有 open 有利用机会。
查找引用 open 函数的位置,发现名为 printFile 的函数
1
2
3
4
5
6
7
8
9
10
11
12
13
14
15
16
17
18
19
20
21
22
23
24
25
26
27
28
29
30
31
32
33
34
35
36
37
38
39
40
41
sub printFile my $charset = &localization::msg('charset' ) || 'UTF-8' ; my ($fullname, $type) = @_; my $fh = FileHandle->new(); my $filename = basename($fullname); my $error = "" ; my $buf = "" ; if (! open ($fh, "$fullname" )) { $error = &localization::msg(26 ); return $error; } $contenttype = noRewriteContentType($filename); if ($contenttype eq "" ) { if (-T "$fullname" ) { $contenttype = "text/plain" ; } else { $contenttype = "application/octet_stream" ; } } if ($type eq "SMB" ) { while ($filename =~ /:([0-9a-f][0-9a-f])/ ) { $sjisbyte = hex ($1); $sjisbyte = pack ("C" , $sjisbyte); $filename =~ s/:[0-9a-f][0-9a-f]/$sjisbyte/ ; } } print "Content-Type:${contenttype} ;charset=${charset} \n\n" ; binmode STDOUT; while (read ($fh, $buf, 8192 )) { print $buf; } close ($fh); return "" ; }
第 10 行调用了 open 函数去打开外部传递的参数 $fullname,查看使用 printFile 的位置可以定位到位于 cifs 文件中的 downloadSmbFile 函数。
1
2
3
4
5
6
7
8
9
10
11
12
13
14
15
16
17
18
19
20
21
22
23
24
25
26
27
28
29
30
31
32
33
34
35
36
37
38
39
40
41
42
43
44
45
46
47
48
49
50
51
52
53
54
55
56
57
58
59
60
61
62
63
64
65
66
67
68
69
70
71
72
73
74
75
76
77
78
79
80
81
82
83
84
85
86
87
88
89
90
91
92
93
94
95
96
97
98
99
100
101
102
103
104
sub downloadSmbFile my ($p, $kvars, $h_ip) = @_; my $uname = $kvars->{'uname' }; my $password = $kvars->{'password' }; my $workgroup = fileshare::get_workgroup($p, $kvars); my $path = $p->url_param('path' ); my $service = $p->url_param('service' ); my $contenttype = "" ; my $error = "" ; my $file = basename($path); my $dir = dirname($path); $tmpdir = `mktemp -d /tmp/tempfsXXXXXX` ; chomp $tmpdir; &secure_common::secureBackticks("/bin/chmod" , "777" , $tmpdir); if ($? !=0 ) { $error = &localization::msg(3 ); goto DOWNLOADSMBFILE_END; } @service = &cifs_common::parseSmbService($service); my $service_name = $service[0 ]; my $service_options = $service[1 ]; my $loop_counter = 0 ; my $smbshare = "" ; while ($loop_counter < $dfs_common::MAX_DFS_HOPS) { $loop_counter++; $smbshare = &secure_common::secureBackticks('/ca/fileshare/samba/bin/smbclient' , "$service_name" , "$password" , '-U' , "$uname" , '-W' , "$workgroup" , '-c' , "AfterLogOnCmd;cd \"$dir\";AfterCdCmd;get \"$file\" \"$tmpdir/$file\";AfterGetCmd" , "$service_options" ); $error = &cifs_common::getSmbConnInfo($smbshare); if ($error ne "Success" ) { $error = &cifs_common::printSmbConnError($error); goto DOWNLOADSMBFILE_END; } else { $error = "" ; } $error = &cifs_common::getSmbCmdInfo($smbshare, "AfterLogOnCmd: command not found" , "AfterCdCmd: command not found" ); my $check_dfs = &dfs_common::smbDfsError($error); if ($check_dfs ne "" ) { ($service_name, $dir, $h_ip) = &dfs_common::smbDfsReferral($smbshare, $service_name, $dir, $h_ip, $kvars->{'site_id' }); next ; } last ; } if ($error ne "" ) { $error = &localization::msg(115 ,$dir); goto DOWNLOADSMBFILE_END; } $error = &cifs_common::getSmbCmdInfo($smbshare, "AfterCdCmd: command not found" , "AfterGetCmd: command not found" ); $error = parseSmbGetResult($error); if ($error ne "" ) { if ( $error eq "NT_STATUS_ACCESS_DENIED" ) { $error = &localization::msg(116 , $file); } else { $error = &localization::msg(117 , $file); } &fastlog::perl_fastlog(fastlog::LOG_NOTICE, $fastlog_method, $fastlog_code_permission_fail, $fastlog_msg_permission_fail, \%fastlog_optional); goto DOWNLOADSMBFILE_END; } if ($error eq "" ) { $error = &fileshare::printFile("$tmpdir/$file" , "SMB" ); } if ($error eq "" ) { $fastlog_optional{'rcvd' } = (stat "$tmpdir/$file" )[7 ]; &fastlog::perl_fastlog(fastlog::LOG_INFO, $fastlog_method, $fastlog_code_success, $fastlog_msg_success, \%fastlog_optional); } DOWNLOADSMBFILE_END: &secure_common::secureBackticks("rm" , "-rf" , $tmpdir); if ($error ne "" ) { &fileshare::displayInfo($p, $kvars, &localization::msg(26 ), $error, undef , undef ); } }
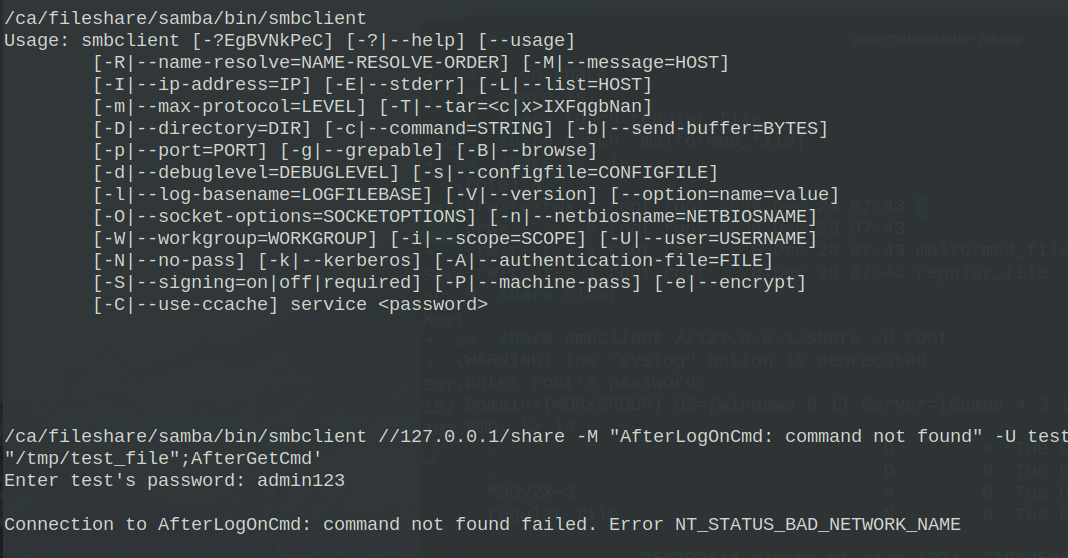
简单来说,这个函数负责从远程 SMB 服务器上下载文件到本地,用户可以提供服务器的地址、文件路径、用户名和密码等参数,最后代码会调用 secureBackticks 函数以数组方式执行 smbclient 程序,完成下载文件操作。这里可以控制 smbclient 的各项参数,但是并不能直接获取 shell。
在调用 printFile 函数的位置会用 $tmpdir 和 $file 两个参数拼接一个路径,其中 $file 参数即 $path 是用户可控的。看起来只需要控制 $path 参数即可实现命令执行,但是仔细观察代码逻辑发现并没有这么简单。只有当 $error 为空,即从 smb 服务器取回文件时没有出错才能执行 printFile 函数。
最初我想到先在远程服务器上搭建一个 SMB 服务器,在服务器中放一个文件名带有 | 字符的文件,然后正常构造各个参数让 smbclient 取回这个文件,不过 SMB 服务不能支持文件名带有 | 的文件。
例如以下测试:
这个包含非法字符的文件会被自动重命名。
那么这个位置就无法利用了吗?我们仔细观察代码逻辑,在判断命令是否执行成功时调用了函数 getSmbConnInfo 以及 getSmbCmdInfo
1
2
3
4
5
6
7
8
9
10
11
12
13
14
15
16
17
18
19
20
21
22
23
24
25
26
27
28
29
30
31
32
33
34
35
36
37
38
sub getSmbConnInfo my ($output) = @_; if ($output =~ /AfterLogOnCmd: command not found/ ) { return "Success" ; } if ($output =~ /STATUS_DUPLICATE_NAME/ ) { return "NT_STATUS_DUPLICATE_NAME" } @output = split (" " , $output); return $output[scalar (@output)-1 ]; } sub getSmbCmdInfo my ($output, $delimiter1, $delimiter2) = @_; if (! $output =~ /^$delimiter1$/m ) { return "Error" ; } if (! $output =~ /^$delimiter2$/m ) { return "Error" ; } @output = split (/^$delimiter1$/m , $output); @output = split (/^$delimiter2$/m , $output[1 ]); $output = $output[0 ]; $output =~ s/^\s+// ; $output =~ s/\s+$// ; return $output; }
这些函数尝试在命令的输出中匹配一些字符串,如果匹配成功则返回成功。
首先按照代码中的命令构造一条,在设备的终端执行:
随意构造的服务器地址导致返回无法连接错误信息。我们看到 smbclient 带有一个 -M 选项,尝试添加此选项:
添加选项之后打印了我们控制的信息。合理利用各个参数来排布这些错误信息,结合代码判断命令成功的方式,就可以绕过这些判断函数,从而执行到 printFile。这样 path 参数就完全可控,不受非法字符限制,我们只需要构造命令注入 payload,并在其末尾添加一个 | 字符即可实现代码执行。
权限提升 通过上面的命令执行只能以 nobody 权限执行命令,需要考虑如何提权。
提权首先要考虑使用系统中自带的,具有 SUID 权限的二进制程序,通过筛选此类文件,可以找到一个名为 webui_localdb_file 的程序。
1
2
3
4
5
6
7
8
9
10
11
12
13
14
15
16
17
18
19
20
21
int __cdecl main (int argc, const char **argv, const char **envp) { seteuid(0 ); setegid(0 ); switch ( *argv[1 ] ) { case 'b' : snprintf (cmd_str, 0x400 uLL, "cp %s/%s %s/%s" , "/tmp" , argv[2 ], "/ca/fileshare/htdocs/client_sec/l3vpn" , argv[2 ]); goto LABEL_25; case 'c' : snprintf (path_str, 0x200 uLL, "/ca/conf/uconf/%s" , argv[2 ]); if ( lstat(path_str, &sb) == -1 ) { snprintf (cmd_str, 0x400 uLL, "mkdir -p -v -m 755 /%s" , path_str); system(cmd_str); } memset (cmd_str, 0 , sizeof (cmd_str)); snprintf (cmd_str, 0x400 uLL, "cp %s/%s %s/%s" , "/tmp" , argv[3 ], path_str, argv[3 ]); goto LABEL_25; }
我们看到程序首先调用 seteuid 和 setegid 设置权限到 root,然后根据外部传入的参数执行各种命令,显然存在命令注入,利用此程序即可实现权限提升。
演示 请观看下面的演示视频:
本文介绍了关于 ArrayNetworks vxAG 设备 License 破解和 SSLVPN 远程代码执行的相关内容,文中还有一些细节需要解决,另外在新版中 webui_localdb_file 对输入的参数进行了过滤。如何在新版中实现提权?如何解决代码执行中的一些小问题?我们就留给读者去探索吧。


